本文为以下文章的续篇。
之前的设置方法请参阅下文。
问题
我们公司向员工分发了 iPad(第10代)作为工作设备。
员工在平时的居家办公中使用各自的电脑访问 WorkSpaces 进行工作。
由于 iPad 上也可以安装 WorkSpaces 客户端应用程序,因此我们考虑让员工在外出时使用 iPad 连接到 WorkSpaces 进行工作。
我们设想使用 iPad 的 Magic Keyboard 进行操作,但遇到了一个问题,即虽然可以登录 WorkSpaces,但箭头键无法使用。
原因
经过研究,我无法确认原因或同一事件,说实话,原因不明。
由于是在多台设备上发生的,所以似乎不是设备方面的问题,但我在网上也找不到任何类似事件的报告。
不过,我已经按以下方法解决了这个问题,现在我暂时可以操作方向键了,所以这很好。
方法
总而言之,我们通过 RDP 连接到 WorkSpaces。
问题似乎出在 PCoIP 连接上,通过使用 RDP 连接 WorkSpaces,可以正常使用箭头键。
以下内容作为参考。
我如何使用 RDP 连接到我的 WorkSpace?
https://repost.aws/zh-Hans/knowledge-center/connect-workspace-rdp
不过,由于希望保持 WorkSpaces 所在的子网为私有子网,我们还决定使用 AWS Client VPN。
因为在 WorkSpaces 中已经使用了 Directory Service,因此可以直接用于 AWS Client VPN 的认证。
这相当方便,员工可以使用平时的密码连接 AWS Client VPN。
配置如下所示。

管理员方面的步骤
我采取的配置准备步骤如下:
修改 WorkSpaces 的安全组
将 WorkSpaces 的安全组更新为允许来自 VPC 内的 RDP 通信。
假设 VPC CIDR 为 10.0.0.0/16,执行了以下 AWS CLI 命令。
# Get the ID of the security group for WorkSpaces
SECURITY_GROUP_ID=$(aws ec2 describe-security-groups \
    --query "SecurityGroups[?ends_with(GroupName, '_workspacesMembers')].GroupId" \
    --output text)

# Add an inbound rule to allow RDP traffic from VPC
aws ec2 authorize-security-group-ingress \
    --group-id "$SECURITY_GROUP_ID" \
    --protocol tcp \
    --port 3389 \
    --cidr 10.0.0.0/16
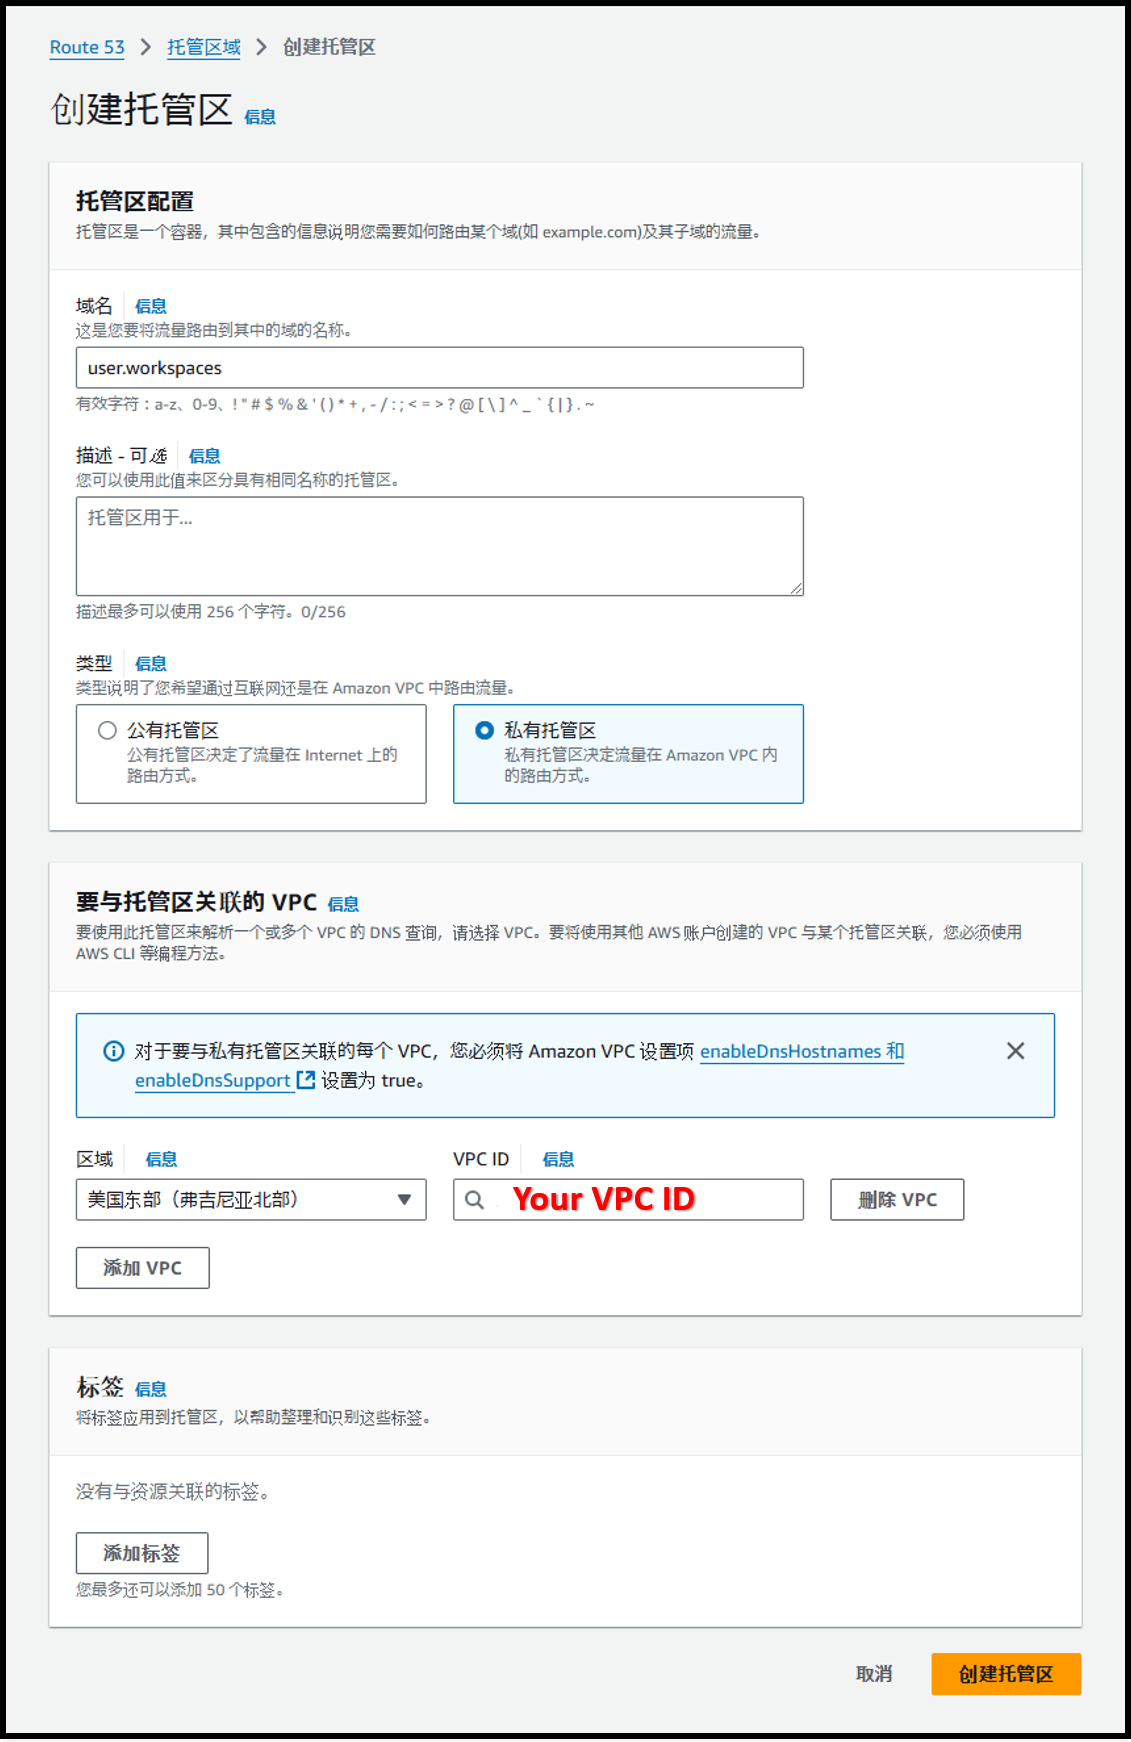
创建 Route 53 托管区域
员工通过 RDP 连接到 WorkSpaces 时,需要输入 WorkSpaces 的 IP 地址。
由于只有管理员(我)可以查看 IP 地址,单独通知每位员工会很麻烦。
因此,我们决定基于用户 ID 自动分配域名。
- 请通过以下 URL 创建 Route 53 托管区域:
https://us-east-1.console.aws.amazon.com/route53/v2/hostedzones#CreateHostedZone - 使用以下设置进行配置:
- 域名:user.workspaces
- 类型:⦿ 私有托管区
- 要与托管区关联的 VPC
- 区域:美国东部(弗吉尼亚北部)
- VPC ID:WorkSpaces 所在的 VPC
图像
创建 Lambda 处理程序
可以通过 Lambda 处理程序设置在连接 Client VPN 时需要同时执行的程序或操作。
由于 WorkSpaces 处于活动状态时成本较高,因此设置为 AutoStop 模式。
因此,Lambda 处理程序会在每次需要时启动 WorkSpaces。
此外,Lambda 处理程序会将 WorkSpaces 的 IP 地址注册到 Route 53 托管区域。
- 请运行以下 AWS CLI 命令来创建 Lambda 函数的 IAM 角色:
# Create IAM role
aws iam create-role \
    --role-name LambdaRole-WorkSpaces \
    --assume-role-policy-document '{
       "Version": "2012-10-17",
       "Statement": [
           {
               "Effect": "Allow",
               "Principal": {
                   "Service": "lambda.amazonaws.com"
               },
               "Action": "sts:AssumeRole"
           }
       ]
    }'

# Attach the IAM policy required for updating Route 53
aws iam attach-role-policy \
    --role-name LambdaRole-WorkSpaces \
    --policy-arn arn:aws:iam::aws:policy/AmazonRoute53FullAccess

# Attach the IAM policy required for updating WorkSpaces
aws iam attach-role-policy \
    --role-name LambdaRole-WorkSpaces \
    --policy-arn arn:aws:iam::aws:policy/AmazonWorkSpacesAdmin

# Attach the IAM policy required for logging
aws iam attach-role-policy \
    --role-name LambdaRole-WorkSpaces \
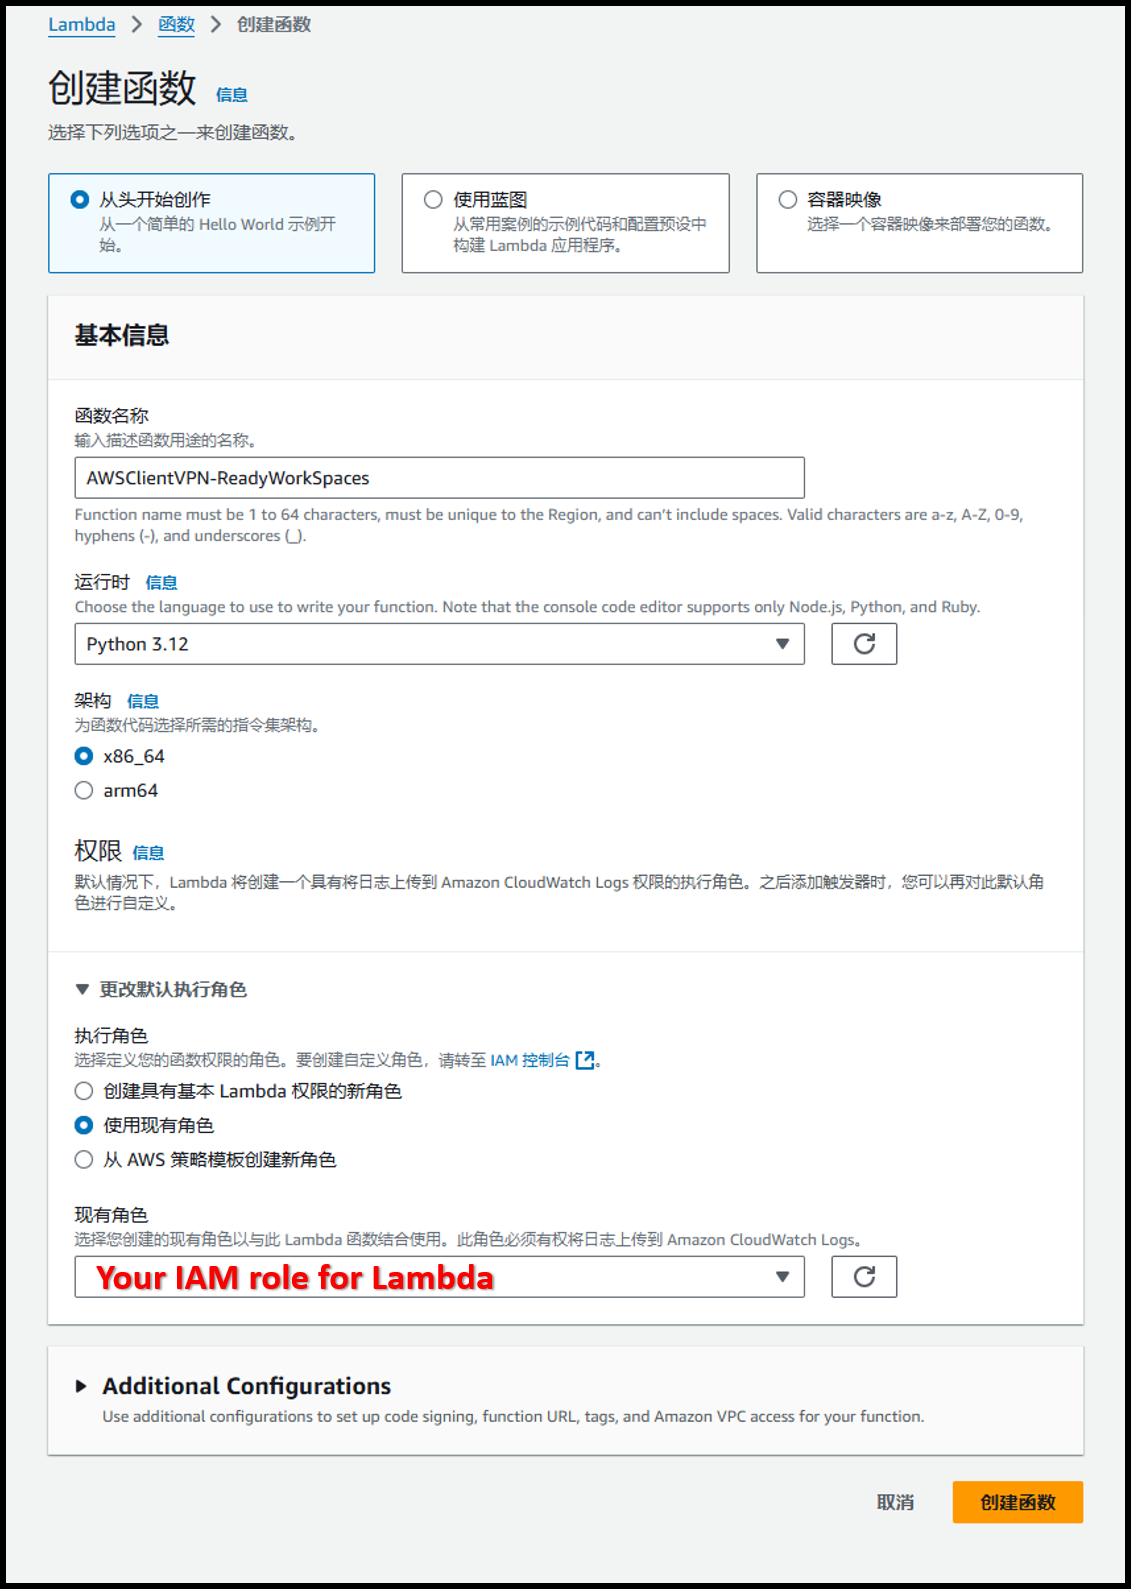
--policy-arn arn:aws:iam::aws:policy/CloudWatchLogsFullAccess- 请通过以下 URL 创建 Lambda 函数:
https://us-east-1.console.aws.amazon.com/lambda/home?region=us-east-1#/create/function - 使用以下设置进行配置:
- 函数名称:AWSClientVPN-ReadyWorkSpaces
* 必须以 "AWSClientVPN-" 开头† - 运行时:Python 3.12
- 执行角色:LambdaRole-WorkSpaces
- 函数名称:AWSClientVPN-ReadyWorkSpaces
图像
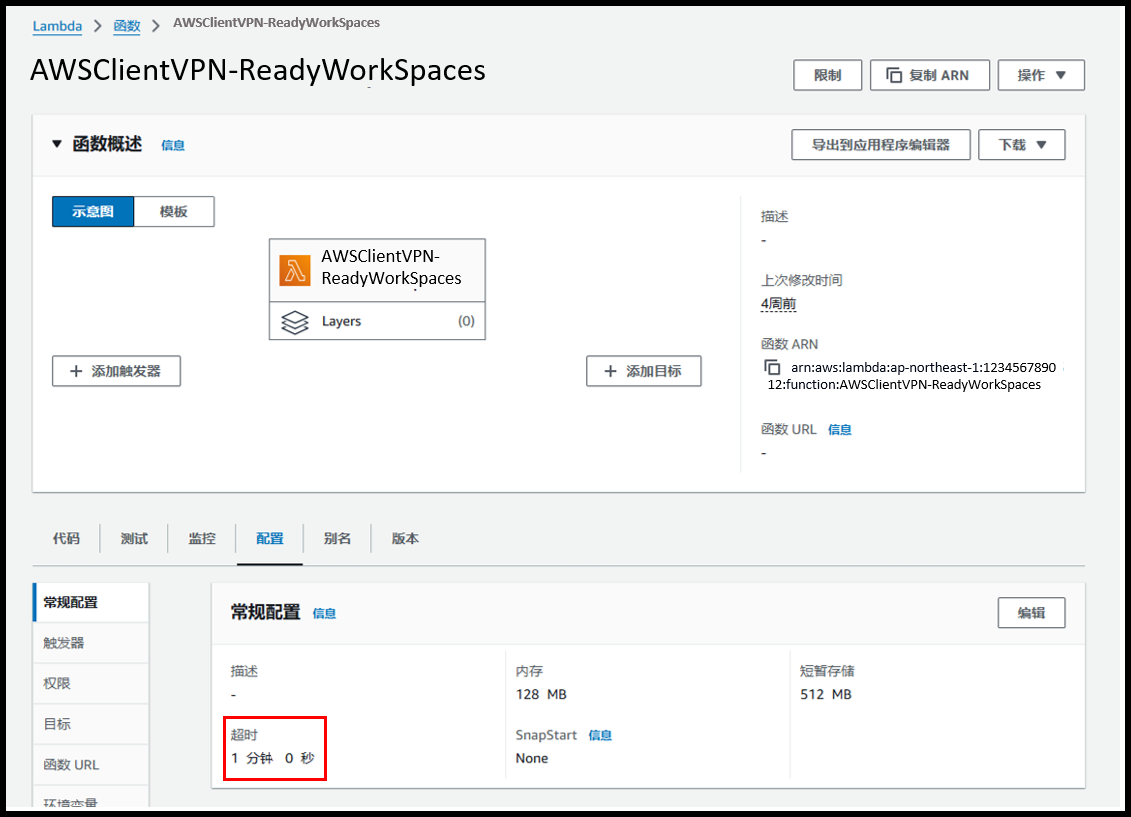
- 前往 [配置] 选项卡 > [常规配置],将超时时间改为1分钟。
图像
- 接下来输入 Lambda 函数的代码。
大部分由 ChatGPT 编写,代码如下:
import boto3

def lambda_handler(event, context):.

    # Resource information
    directory = '<Your Active Directory ID>'
    hostedzone = '<Your Route 53 Hosted Zone ID>'
    domain = 'user.workspaces'

    # Get username from event
    username = event.get('username')

    if not username:
        return {
            "allow": True,
            "error-msg-on-failed-posture-compliance": "Username not provided",
            "posture-compliance-statuses": [],
            "schema-version": "v2"
        }

    # Create WorkSpaces client
    workspaces_client = boto3.client('workspaces')

    # Get the user's WorkSpaces
    response = workspaces_client.describe_workspaces(
        DirectoryId=directory,
        UserName=username
    )
    workspaces = response.get('Workspaces', [])

    if not workspaces:
        return {
            "allow": True,
            "error-msg-on-failed-posture-compliance": f'No WorkSpaces found for user {username}',
            "posture-compliance-statuses": [],
            "schema-version": "v2"
        }

    # Start WorkSpaces
    workspace_id = workspaces[0]['WorkspaceId']
    workspaces_client.start_workspaces(
        StartWorkspaceRequests=[
            {'WorkspaceId': workspace_id}
        ]
    )

    # Get the IP address of the WorkSpaces
    workspace_ip = workspaces[0]['IpAddress']

    # Create a Route 53 client
    route53_client = boto3.client('route53')

    # Create a subdomain name
    subdomain = f"{username}.{domain}”

    # Create a record
   try:
        route53_client.change_resource_record_sets(
            HostedZoneId=hostedzone,
            ChangeBatch={
                'Changes': [
                    {
                        'Action': 'CREATE',
                        'ResourceRecordSet': {
                            'Name': subdomain,
                            'Type': 'A',
                            'TTL': 300,
                            'ResourceRecords': [{'Value': workspace_ip}]
                        }
                    }
                ]
            }
        )

    except Exception as ex:
        route53_client.change_resource_record_sets(
            HostedZoneId=hostedzone,
            ChangeBatch={
                'Changes': [
                    {
                        'Action': 'UPSERT',
                        'ResourceRecordSet': {
                            'Name': subdomain,
                            'Type': 'A',
                            'TTL': 300,
                            'ResourceRecords': [{'Value': workspace_ip}]
                        }
                    }
                ]
            }
        )

    return {
        "allow": True,
        "error-msg-on-failed-posture-compliance": f'Successfully started WorkSpaces for user {username}',
        "posture-compliance-statuses": [],
        "schema-version": "v2"
    }
在 ACM 中颁发证书
要创建 Client VPN 端点,需要 ACM 的证书。
如果您已拥有一个域名,可以立即颁发证书;但如果没有域名,则需要自己生成证书并将其导入 ACM。
在我的情况下,我使用 CloudShell 创建了证书并将其导入到 ACM。
- 按照以下 URL 中步骤 "a" 启动 CloudShell。
https://docs.aws.amazon.com/zh_cn/cloudshell/latest/userguide/getting-started.html#launch-region-shell
- 在导航栏上,选择图CloudShell标。

- 运行以下 URL 中提供的命令来颁发和导入证书。
https://docs.aws.amazon.com/zh_cn/vpn/latest/clientvpn-admin/client-auth-mutual-enable.html
$git clone https://github.com/OpenVPN/easy-rsa.git$cd easy-rsa/easyrsa3$./easyrsa init-pki$./easyrsa build-ca nopass$./easyrsa --san=DNS:server build-server-full server nopass$mkdir ~/custom_folder/$cp pki/ca.crt ~/custom_folder/$cp pki/issued/server.crt ~/custom_folder/$cp pki/private/server.key ~/custom_folder/$cd ~/custom_folder/$aws acm import-certificate --certificate fileb://server.crt --private-key fileb://server.key --certificate-chain fileb://ca.crt
创建和配置 Client VPN 端点
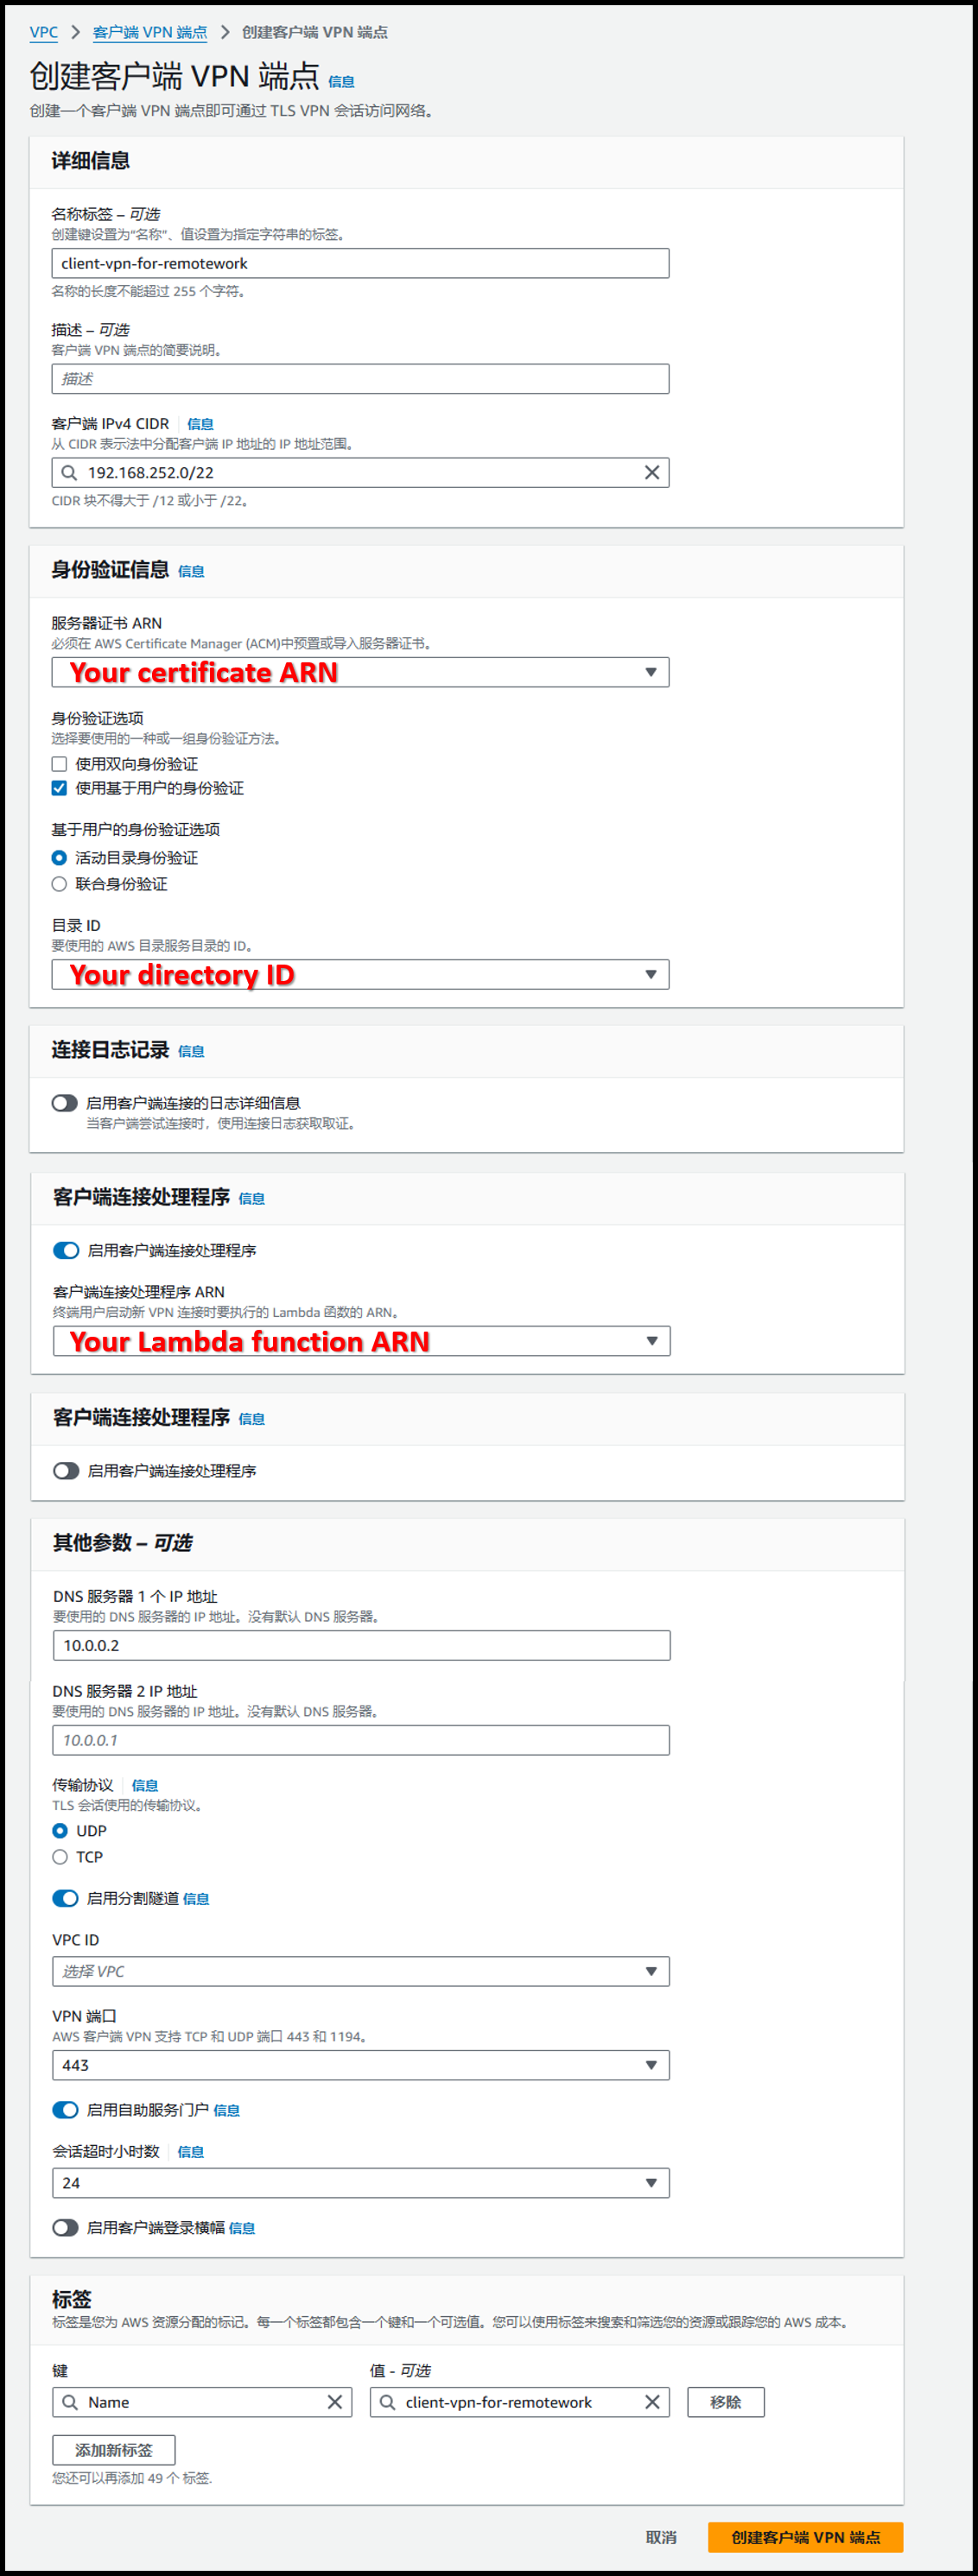
- 使用以下 URL 创建 Client VPN 端点:
https://us-east-1.console.aws.amazon.com/vpcconsole/home?region=us-east-1#CreateClientVpnEndpoint: - 使用以下设置进行配置:
- 名称标签 – 可选:client-vpn-for-remotework
- 客户端 IPv4 CIDR:192.168.252.0/22
* 确保与 VPC CIDR 无重叠。† - 服务器证书 ARN:在 ACM 中颁发证书 中导入的证书
- 身份验证选项:☑️ 使用基于用户的身份验证
- 基于用户的认证选项:⦿ 活动目录身份验证
- 目录 ID:WorkSpaces 中使用的目录
- 其他参数 – 可选
- DNS 服务器 1 IP 地址:VPC CIDR +2 的 IP 地址
- 若 VPC CIDR 为 10.0.0.0/16,则为 10.0.0.2。
- 使用私有托管区域时需要指定 VPC CIDR +2。
- 启用分割隧道:已启用
- 若禁用,iPad 的所有流量将通过 AWS 路由。
- 只需要 WorkSpaces 的流量,因此启用该选项。
- 启用自助服务门户:已启用
- 允许员工自行下载配置文件。
- DNS 服务器 1 IP 地址:VPC CIDR +2 的 IP 地址
图像
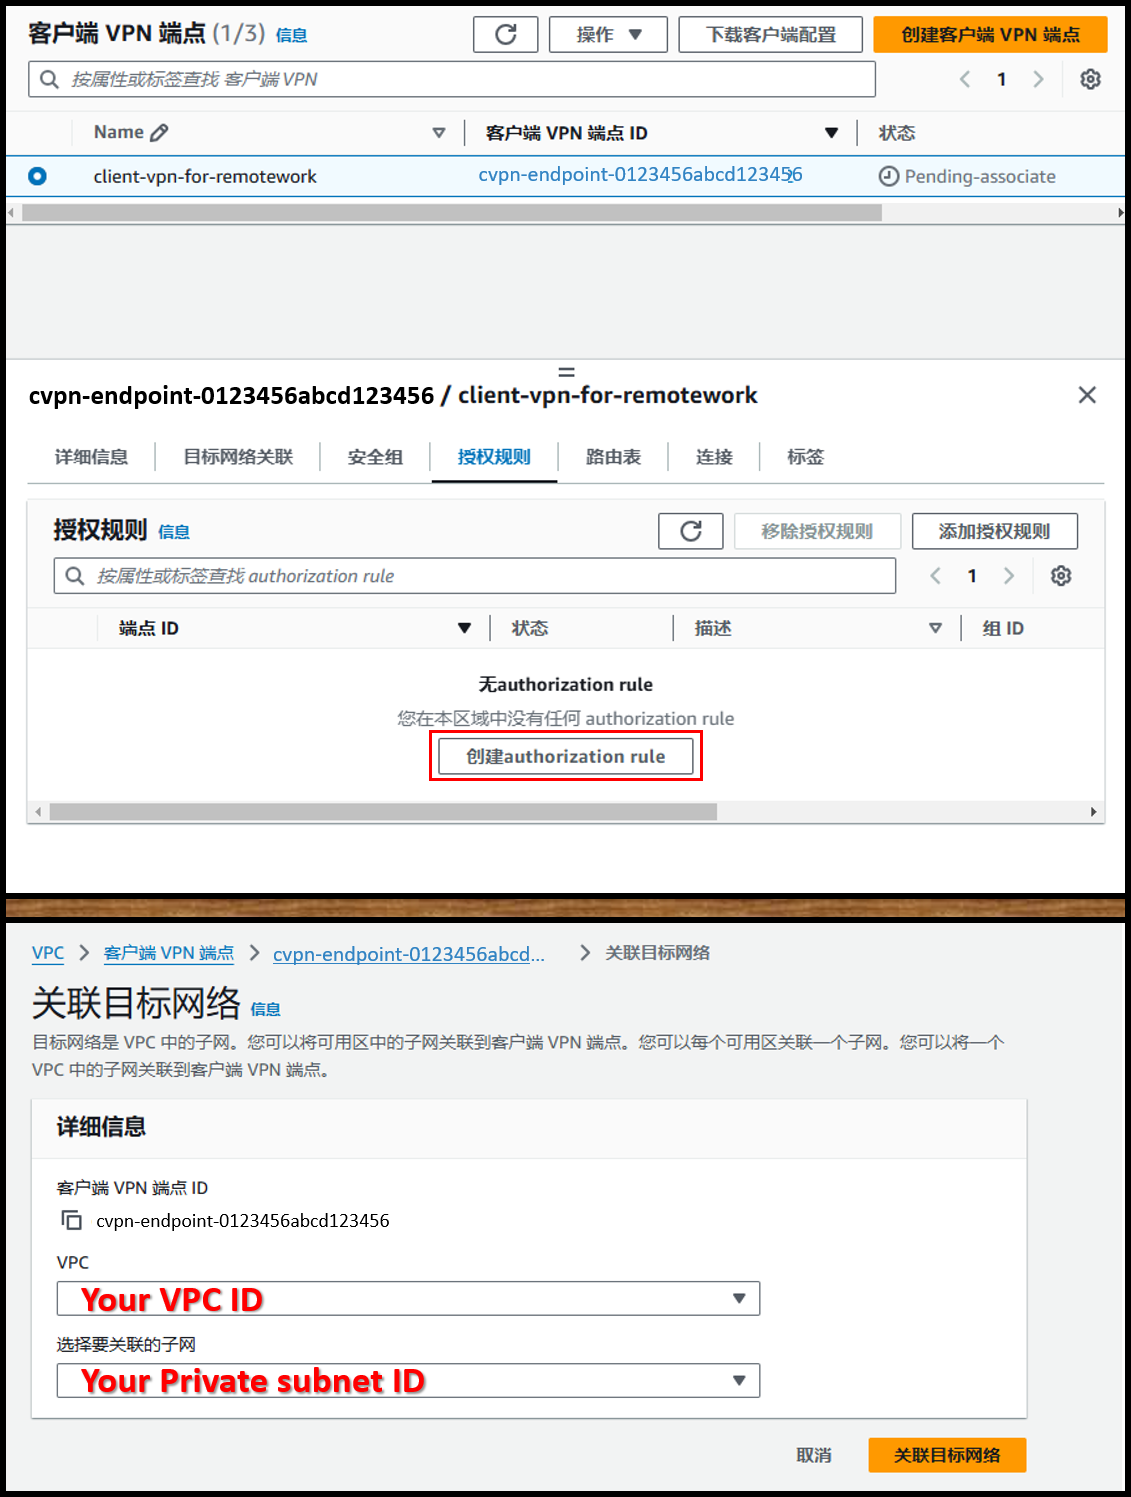
- 从 [目标网络关联] 选项卡中,关联目标网络。
- VPC:包含 WorkSpaces 的 VPC
- 选择要关联的子网:一个私有子网
图像
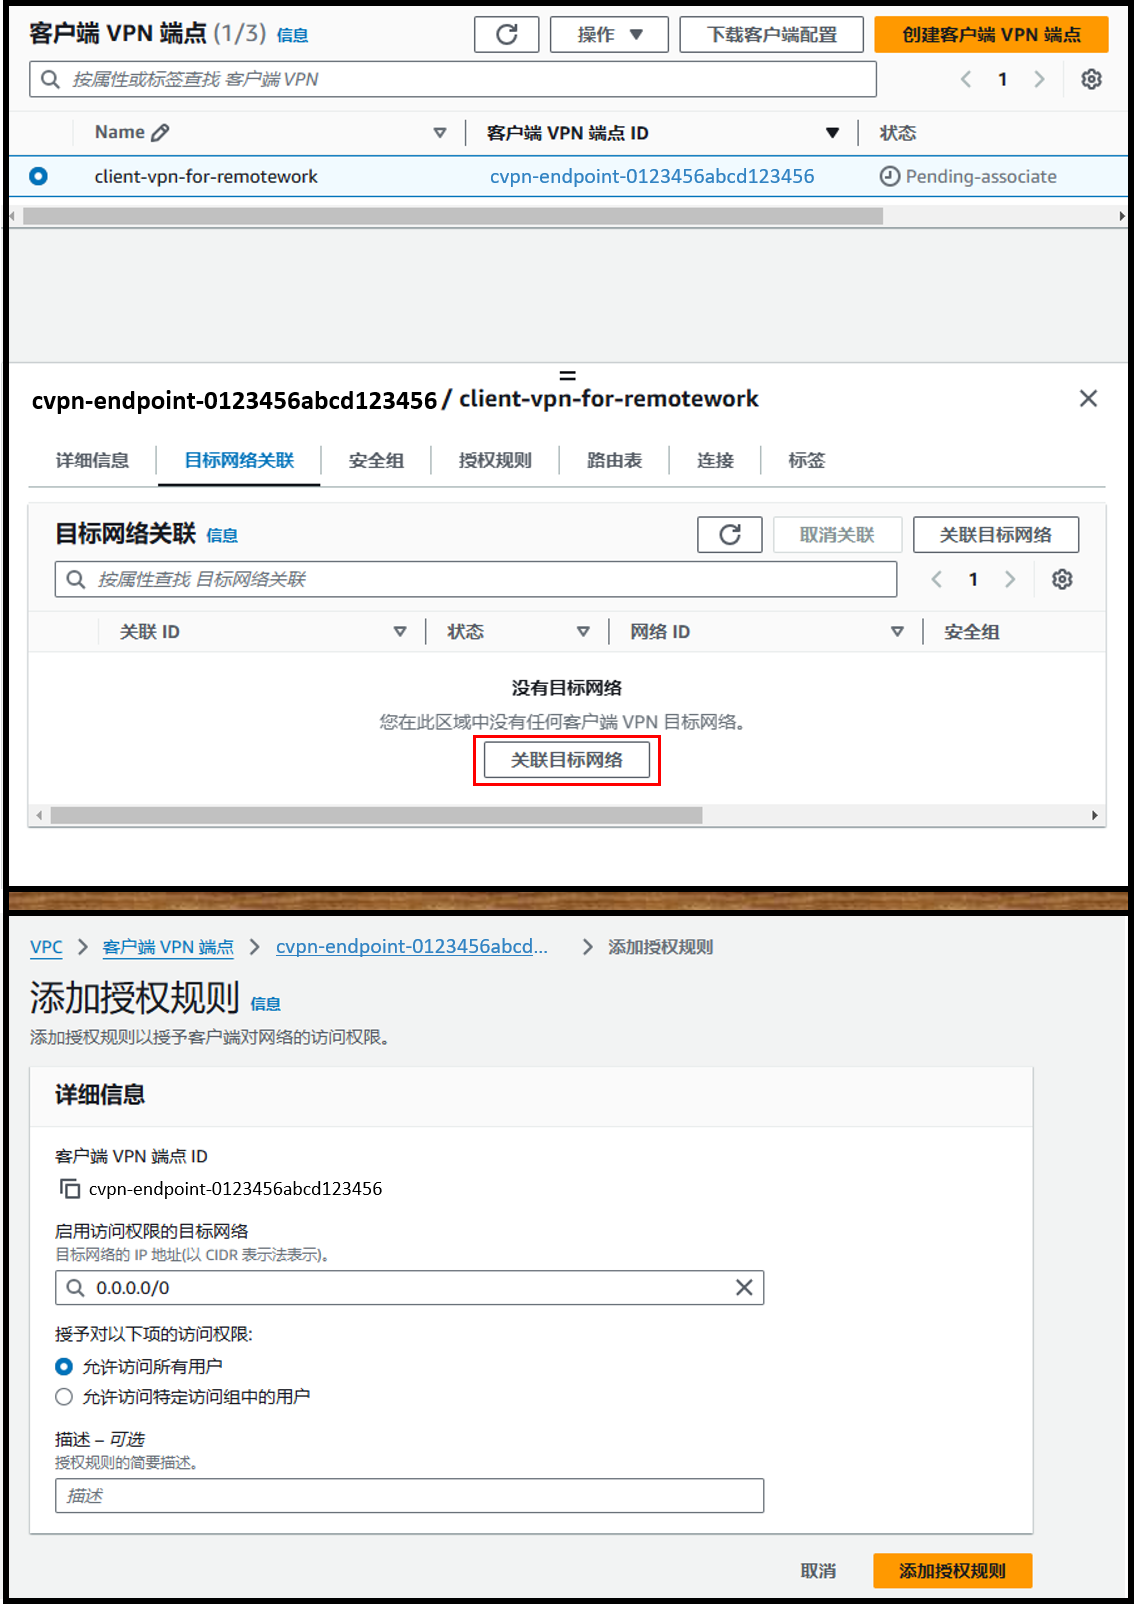
- 从 [授权规则] 选项卡中,添加授权规则。
- 启用访问权限的目标网络:0.0.0.0/0
- 授予对以下项的访问权限:⦿ 允许访问所有用户
图像
- 等待 Client VPN 端点状态变为 Available。
图像

用户方面的步骤
针对该配置,我向员工提出了以下请求:
- 在 iPad 上安装 OpenVPN 客户端
- 从自助服务门户下载配置文件
- URL:https://self-service.clientvpn.amazonaws.com/endpoints/<endpoint-id>
- 将配置文件导入 OpenVPN 客户端
- 在 iPad 上安装 RD 客户端
- 在 RD 客户端中添加 PC
- 主机名:
<user-id>.user.workspaces
- 主机名:
连接时,员工通过 OpenVPN 连接到 Client VPN,然后使用 RD 客户端通过 RDP 连接到 WorkSpaces。
实施过程非常顺利,遇到问题的员工也很少。
目前看来,这一配置运作良好,因此我会继续观察。
希望这对其他人有所帮助。
