

背景
为了将公司内部网络与 AWS 通过 VPN 连接,公司终于分发了 VPN 路由器。
上次我们发现需要将路由器连接到电脑,因此尝试通过 Ubuntu 笔记本进行串行连接。
具体操作已在以下文章中介绍,如果感兴趣可以参考。

接下来计划开始配置,但发现路由器上残留了之前的配置。尝试初始化时,发现没有相关的手册,官方页面似乎也不再提供支持,相关页面已经被删除。
方法
对熟悉的人来说,这些操作可能很简单,但为了备份,我将操作步骤记录下来,供日后参考。
公司内部未正式公开这些内容,但我打算将这个网站分享给我的接任者。
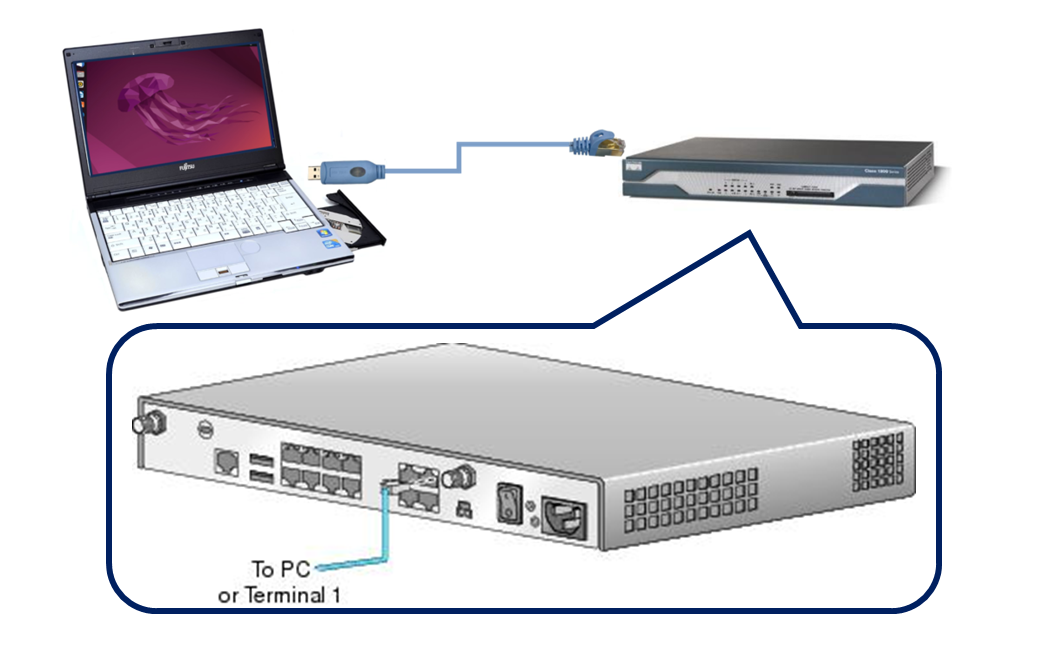
以下是和上次相同的设备结构:
- 笔记本电脑(Ubuntu Desktop 22.04 LTS)
- VPN 路由器(Cisco 1812J)
- USB RJ45 控制台线
初始化步骤
- 确认串行电缆的 USB 端口并连接至 Cisco 1812J。
guest@ubuntu:∼$ sudo dmesg | grep ttyUSB
[ 34.739950] usb 1-1.3.4: FTDI USB Serial Device converter now attached to ttyUSB0
[ 34.996889] usb 1-1.3.1: pl2303 converter now attached to ttyUSB1
guest@ubuntu:∼$ cu --speed 9600 --parity=none --line /dev/ttyUSB0
Connected.

Router1>- 在用户模式下(提示符开头为
>),只能执行基本的监控命令。为初始化设置,需要切换到特权模式(提示符开头为#)。在特权模式下,可以执行更高权限的命令。
本次的默认密码是cisco。
Router1> enable
Password: cisco- 删除现有配置并重启路由器。
Router1# erase startup-config
Erasing the nvram filesystem will remove all configuration files! Continue? [confirm] <Press ENTER key>
[OK]
Erase of nvram: complete
*Apr  1 13:09:39.943: %SYS-7-NV_BLOCK_INIT: Initialized the geometry of nvram
Router1# reload
Proceed with reload? [confirm] <Press ENTER key>
*Apr 12 13:56:57.875: %SYS-5-RELOAD: Reload requested by console. Reload Reason: Reload Command.- 随后会自动启动初始设置,根据提示完成配置。需要输入文字或按下 Enter 键。主要配置如下:
- 路由器名称:Router1
- 特权模式加密密码:cisco
- 特权模式明文密码:cisco
- Telnet 登录密码:cisco
- 连接公司内网的接口:FastEthernet1
- FastEthernet1 的 IP 地址:192.168.101.1
- FastEthernet1 的子网掩码:255.255.255.0 (/24)
         --- System Configuration Dialog ---

Would you like to enter the initial configuration dialog? [yes/no]: yes

At any point you may enter a question mark '?' for help.
Use ctrl-c to abort configuration dialog at any prompt.
Default settings are in square brackets '[]'.

Basic management setup configures only enough connectivity
for management of the system, extended setup will ask you
to configure each interface on the system

Would you like to enter basic management setup? [yes/no]: yes
Configuring global parameters:

  Enter host name [Router]: Router1 <- YOUR ROUTER NAME

  The enable secret is a password used to protect access to
  privileged EXEC and configuration modes. This password, after
  entered, becomes encrypted in the configuration.
  Enter enable secret: cisco <- enable PASSWORD ENCRYPTED

  The enable password is used when you do not specify an
  enable secret password, with some older software versions, and
  some boot images.
  Enter enable password: cisco <- enable PASSWORD
% Please choose a password that is different from the enable secret
  Enter enable password: cisco <- enable PASSWORD AGAIN

  The virtual terminal password is used to protect
  access to the router over a network interface.
  Enter virtual terminal password: cisco <- PASSWORD FOR telnet LOGIN
  Configure SNMP Network Management? [yes]: <Press ENTER key>
    Community string [public]: <Press ENTER key>

Current interface summary

Any interface listed with OK? value "NO" does not have a valid configuration

Interface                  IP-Address      OK? Method Status                Protocol
BRI0                       unassigned      NO  unset  down                  down
BRI0:1                     unassigned      YES unset  down                  down
BRI0:2                     unassigned      YES unset  down                  down
FastEthernet0              192.168.1.10    YES DHCP   up                    up
FastEthernet1              unassigned      NO  unset  up                    down
FastEthernet2              unassigned      YES unset  initializing          down
FastEthernet3              unassigned      YES unset  initializing          down
FastEthernet4              unassigned      YES unset  initializing          down
FastEthernet5              unassigned      YES unset  initializing          down
FastEthernet6              unassigned      YES unset  initializing          down
FastEthernet7              unassigned      YES unset  initializing          down
FastEthernet8              unassigned      YES unset  initializing          down
FastEthernet9              unassigned      YES unset  initializing          down
Vlan1                      unassigned      YES unset  up                    down

Enter interface name used to connect to the
management network from the above interface summary: FastEthernet1 <- INTERFACE TO CONFIGURE

Configuring interface FastEthernet1:
  Use the 100 Base-TX (RJ-45) connector? [yes]: <Press ENTER key>
  Operate in full-duplex mode? [no]: <Press ENTER key>
  Configure IP on this interface? [yes]: <Press ENTER key>
    IP address for this interface: 192.168.101.1 <- IP ADDRESS OF INTERFACE
    Subnet mask for this interface [255.255.255.0] : <Press ENTER key>
    Class C network is 192.168.101.0, 24 subnet bits; mask is /24

The following configuration command script was created:

hostname Router1
enable secret 5 $1$F3nC$LiNukzm2zG5JG1GGhg7mE.
enable password ********
line vty 0 4
password ********
snmp-server community public
!
no ip routing

!
interface FastEthernet0
shutdown
no ip address
!
interface FastEthernet1
no shutdown
media-type 100BaseX
half-duplex
ip address 192.168.101.1 255.255.255.0
!
interface FastEthernet2
shutdown
no ip address
!
interface FastEthernet3
shutdown
no ip address
!
interface FastEthernet4
shutdown
no ip address
!
interface FastEthernet5
shutdown
no ip address
!
interface FastEthernet6
shutdown
no ip address
!
interface FastEthernet7
shutdown
no ip address
!
interface FastEthernet8
shutdown
no ip address
!
interface FastEthernet9
shutdown
no ip address
!
interface Vlan1
shutdown
no ip address
!
end


[0] Go to the IOS command prompt without saving this config.
[1] Return back to the setup without saving this config.
[2] Save this configuration to nvram and exit.

Enter your selection [2]: <Press ENTER key>
The enable password you have chosen is the same as your enable secret.
This is not recommended.  Re-enter the enable password.

media-type 100BaseX
 ^
% Invalid input detected at '^' marker.

Building configuration...
Use the enabled mode 'configure' command to modify this configuration.


Press RETURN to get started!
初始设置完成。
补充设置
虽然不是必须,但建议进行以下设置,以便后续操作。
进入特权模式后切换到配置模式。
Router1> enable
Password: cisco
Router1# conf t
Enter configuration commands, one per line.  End with CNTL/Z.
Router1(config)#- 默认情况下,命令输入错误时会尝试将其解析为 IP 地址。建议关闭该功能。
Router1(config)# no ip domain lookup - 默认情况下,设备会定期尝试通过 TFTP 通信连接 255.255.255.255。如果无法连接,会输出错误
%Error opening tftp://255.255.255.255,建议禁用此功能。
Router1(config)# no service config- 日志会定期输出,但可能中断正在输入的命令。建议调整日志输出设置,使其不会妨碍命令输入。
Router1(config)# line console 0
Router1(config-line)# logging synchronous- 将特权模式的超时时间设置为 30 分 0 秒。
Router1(config)# line console 0
Router1(config-line)# exec-timeout 30 0
完成设置后,可以通过以下命令退出配置模式和特权模式。
Router1(config-line)# exit
Router1(config)# exit
*Apr  6 12:27:49.547: %SYS-5-CONFIG_I: Configured from console by console
Router1# disable
Router1>
我会根据需要随时补充推荐的设置。
虽然缺乏手册,主要依靠互联网信息整理完成,但成功初始化了 Cisco 1812J。
接下来将继续配置以通过 VPN 连接至 AWS,相关内容将在下一篇文章中介绍。