背景
为了降低 AWS Client VPN 的成本,我们计划让员工在需要时自行关联 AWS Client VPN。
作为解决方案,我们决定通过 Lambda 函数执行关联操作,并允许所有员工执行此 Lambda 函数。
但是,为了防止非员工的人员执行此操作,我们为 Lambda 执行设置了用户认证。
以下文章描述了我们公司如何使用 Active Directory 来管理员工的用户 ID。
因此,我们开始探索是否可以使用 Active Directory 用户进行认证。
失败
在进入实际配置之前,让我们先来分享一个失败的尝试作为参考。
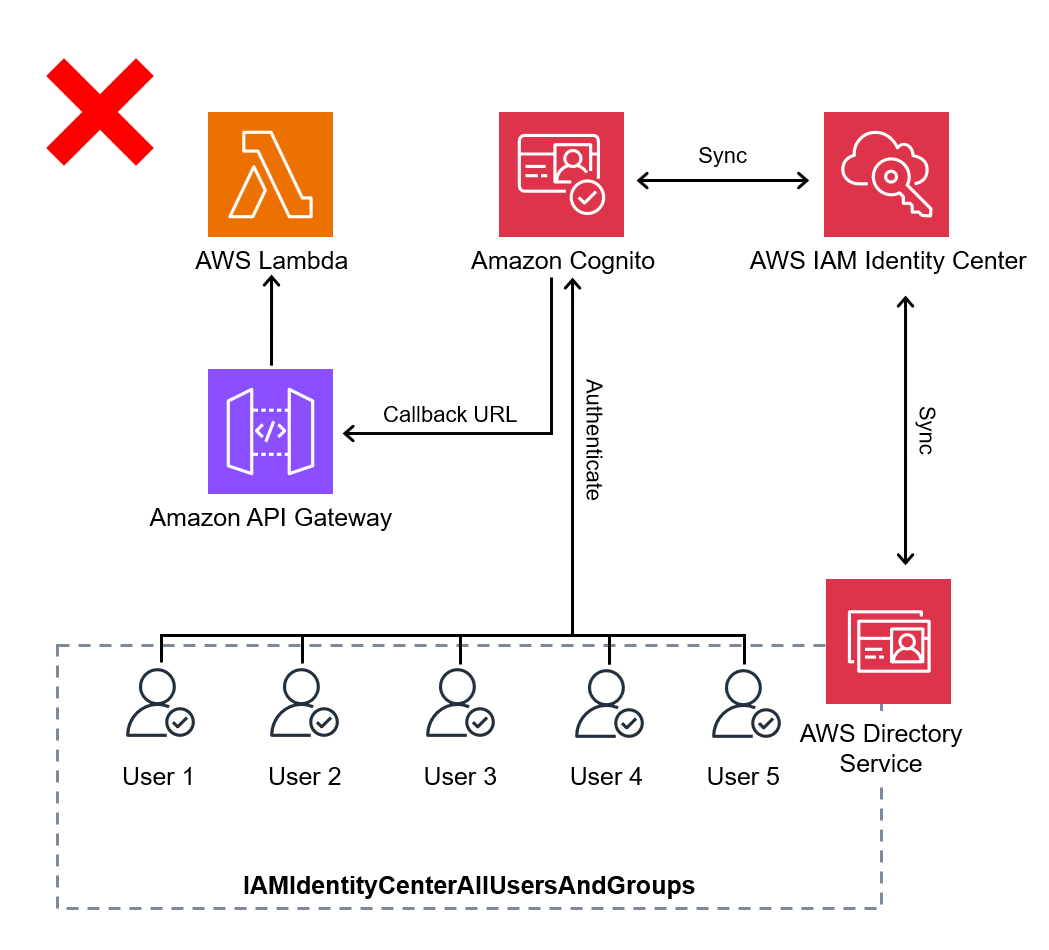
最初的想法是通过 API Gateway 执行 Lambda 函数,并在 API Gateway 中使用 Cognito 认证。
我们认为,如果将 Cognito 的回调 URL 设置为 API Gateway,用户可以通过 Cognito 的登录 URL 进行认证,从而使 API Gateway 能够执行请求。
但这里存在一个问题。
通过 Cognito 登录 URL 成功认证后,id_token 会作为查询参数附加在回调 URL 中。
然而,API Gateway 的认证要求将令牌包含在 Authorization 头中进行请求。
也就是说,即使在 Cognito 中将 API Gateway 指定为回调 URL,API Gateway 的认证仍然无法成功。
虽然可以通过在 Lambda 函数中使用自定义认证来解决,但这需要较多的开发工作,因此我们暂时搁置了这个方案。
失败的配置

方法
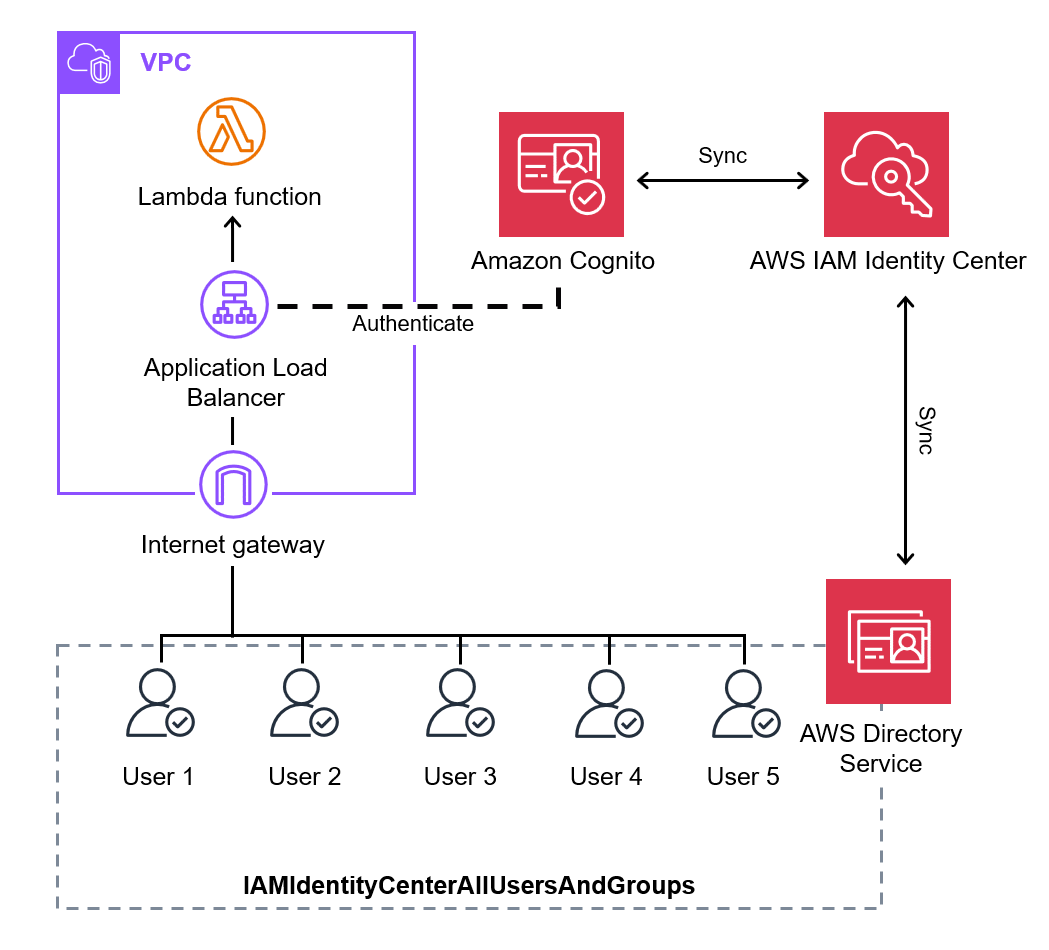
作为替代配置,我们决定使用 ALB 代替 API Gateway。
ALB 同样支持使用 Cognito 进行用户认证。
此外,通过将 Lambda 函数指定为目标,用户认证后可以发送请求并执行 Lambda 函数。
此外,Cognito 用户可以与 IAM Identity Center 集成。
IAM Identity Center 支持将 Active Directory 指定为来源,因此可以通过 IAM Identity Center 用于 Cognito 的认证。
有关如何将 IAM Identity Center 与 Amazon Cognito 用户池集成的更多信息,请参阅:
如何将 IAM Identify Center 与 Amazon Cognito 用户群体集成?
https://repost.aws/zh-Hans/knowledge-center/cognito-user-pool-iam-integration
配置如下:

管理员方面的步骤
我们已经在另一篇文章中完成了 IAM Identity Center 与 Active Directory 的集成。
因此,本篇文章的重点是 Amazon Cognito 和 ALB 的配置。
对于已完成的步骤(用蓝线标出),仅提供其用途的概述,详细步骤请参阅以下文章:
Active Directory 与 IAM Identity Center 的集成
IAM Identity Center 是将用户连接到 AWS 服务的服务。
除了可以直接在 IAM Identity Center 中创建用户外,还可以同步 Active Directory 的用户。
我们公司在其他项目中已经完成了 Active Directory 用户与 IAM Identity Center 的同步。
有关详细步骤,请参阅以下文章。
准备域名
ALB 的 Cognito 认证需要 HTTPS 监听器,因此需要通过 ACM 签发公共证书。
如果您已有域名,流程会更简单。本示例中,我们获取并使用了 awsexample.com。
- 访问以下 URL,通过 Route 53 获取域名:
https://us-east-1.console.aws.amazon.com/route53/domains/home?region=us-east-1#/DomainSearch - 检查所需域名是否可用:
- 检查域的可用性:
awsexample.com - 如果可用,选择该域名并继续结账。
- 检查域的可用性:
图片

- [步骤 1] 定价
- 持续时间:1年
- 自动续订:☑️ 开启
图片

- [步骤 2] 联系人信息
- 用英文字母输入联系人信息。
- 隐私保护:☑️
- 启用(避免公开联系人信息)。
图片

- [步骤 3] 审核并提交
图片

- 获取域名后,确认其公共托管区域已创建:
https://us-east-1.console.aws.amazon.com/route53/v2/hostedzones?region=us-east-1#
通过 ACM 签发证书
- 通过 ACM 请求公共证书:
https://us-east-1.console.aws.amazon.com/acm/home?region=us-east-1#/certificates/request/public- 完全限定域名:
api.awsexample.com- 这是员工访问系统时使用的域名。
- 验证方式:⦿ DNS 验证 - 推荐
- 完全限定域名:
图片

- 点击 [在 Route 53 中创建记录],在
awsexample.com的托管区域中自动生成验证记录。- 验证完成后,将签发证书。
图片

创建 Cognito
- 使用以下 URL 创建 Cognito 用户池:
https://us-east-1.console.aws.amazon.com/cognito/v2/idp/set-up-your-application?region=us-east-1- 命名您的应用程序:ALB for Client VPN
- 登录标识符的选项:☑️ 用户名
- 注册的必要属性:email
- 返回 URL:
https://api.awsexample.com/oauth2/idpresponse- 在计划分配给 ALB 的域名后面添加
/oauth2/idpresponse。
- 在计划分配给 ALB 的域名后面添加
图片

- 在 Amazon Cognito 导航窗格中,转到 [概述] 和 [域] 查看用户池 ID 和 Cognito 域名。
这些信息将在后续的 IAM Identity Center 集成和 ALB 监听器创建中使用。- 用户池 ID:
us-east-1_eXAMPLE - Cognito 域:
https://us-east-1example.auth.us-east-1.amazoncognito.com
- 用户池 ID:
图片

准备与 IAM Identity Center 的集成
- 使用以下 URL 在 IAM Identity Center 中创建应用程序:
https://us-east-1.console.aws.amazon.com/singlesignon/applications/home?region=us-east-1#/add
- [第 1 步] 选择应用程序类型
- 设置首选项:我想设置应用程序
- 应用程序类型:SAML 2.0
图片

- [第 2 步] 配置应用程序
- 配置应用程序:
- 显示名称:Amazon Cognito
- 描述:用于 Amazon Cognito 的自定义 SAML 2.0 应用程序
- 应用程序元数据:⦿ 手动输入元数据值
- 应用程序 ACS URL:
https://us-east-1example.auth.us-east-1.amazoncognito.com/saml2/idpresponse- 在 创建 Cognito [步骤 2] 中验证的 Cognito 域名后添加
/saml2/idpresponse。
- 在 创建 Cognito [步骤 2] 中验证的 Cognito 域名后添加
- 应用程序 ACS URL:
- 应用程序 SAML 受众:
urn:amazon:cognito:sp:us-east-1_eXAMPLE- 使用 创建 Cognito [步骤 2] 中验证的用户池 ID。
- 此时,下载 IAM Identity Center SAML 元数据文件。
该文件将在后续的 Cognito 集成中使用。- IAM Identity Center SAML 元数据文件:
https://portal.sso.ap-northeast-1.amazonaws.com/saml/metadata/ExAmPlExAmPlExAmPlExAmPlExAmPlExAmPlExAmPlE
- IAM Identity Center SAML 元数据文件:
- 配置应用程序:
图片

- 在创建的应用程序详细信息中,转到 [操作] > [编辑属性映射] 并配置属性。
| 应用程序中的用户属性 | 映射到此字符串值,或 IAM Identity Center 中的用户属性 | 格式 |
|---|---|---|
| Subject | ${user:subject} | persistent |
| ${user:email} | basic |
图片

- 在创建的应用程序详细信息中,通过 [分配用户和组] 分配组。
这里分配的组将能够成功通过 Amazon Cognito 认证。
在此例中,分配包含所有员工的组IAMIdentityCenterAllUsersAndGroups。
图片

准备 Cognito 集成
- 使用以下 URL 添加 IAM Identity Center 作为身份提供商:
https://us-east-1.console.aws.amazon.com/cognito/v2/idp/user-pools/us-east-1_eXAMPLE/authentication/social-and-custom-providers/add?region=us-east-1- 身份提供商:SAML
- 提供商名称:IAMIdentityCenter
- 元数据文档来源:⦿ 输入元数据文档端点 URL
https://portal.sso.ap-northeast-1.amazonaws.com/saml/metadata/ExAmPlExAmPlExAmPlExAmPlExAmPlExAmPlExAmPlE- 在 准备与 IAM Identity Center 的集成 [步骤 3] 中确认的 IAM Identity Center SAML 元数据文件
- 在 SAML 提供商和用户池之间映射属性:
- 用户池属性:
email - SAML 属性:
email
- 用户池属性:
图片

- 使用以下 URL 将应用程序客户端 (
ALB for Client VPN) 的身份提供商更改为IAMIdentityCenter:
https://us-east-1.console.aws.amazon.com/cognito/v2/idp/user-pools/us-east-1_eXAMPLE/applications/app-clients/<App Client ID>/login-pages/edit/hosted-ui-settings?region=us-east-1- 将
us-east-1_eXAMPLE替换为 创建 Cognito [步骤 2] 中确认的用户池 ID。 - 将
<App Client ID>替换为 应用程序客户端 ID。 - 身份提供商:IAMIdentityCenter
- 将
图片

创建 Lambda 函数
接下来,创建作为 ALB 目标的 Lambda 函数。
- 运行以下 AWS CLI 命令,为 Lambda 函数创建 IAM 角色:
# Create IAM role
aws iam create-role \
    --role-name LambdaRole-ClientVPN \
    --assume-role-policy-document '{
       "Version": "2012-10-17",
       "Statement": [
           {
               "Effect": "Allow",
               "Principal": {
                   "Service": "lambda.amazonaws.com"
               },
               "Action": "sts:AssumeRole"
           }
       ]
    }'

# Attach the IAM policy required for Client VPN
aws iam attach-role-policy \
    --role-name LambdaRole-ClientVPN \
    --policy-arn arn:aws:iam::aws:policy/AmazonEC2FullAccess

# Attach the IAM policy required for logging
aws iam attach-role-policy \
    --role-name LambdaRole-ClientVPN \
    --policy-arn arn:aws:iam::aws:policy/CloudWatchLogsFullAccess
- 使用以下 URL 创建 Lambda 函数:
https://us-east-1.console.aws.amazon.com/lambda/home?region=us-east-1#/create/function - 按以下设置配置函数:
- 函数名称:
AWSClientVPN-AssociatingSubnets - 运行时:Python 3.13
- 执行角色:
LambdaRole-ClientVPN
- 函数名称:
图片

- 使用以下 URL 将超时时间更改为 1 分钟:
https://us-east-1.console.aws.amazon.com/lambda/home?region=us-east-1#/functions/AWSClientVPN-AssociatingSubnets/edit/basic-settings?tab=configure- 超时:1 分钟
图片

- 为 Lambda 函数添加代码。
输入代码后,需要单击 Deploy 或使用快捷键 Ctrl+Shift+U 部署。
大部分代码是使用 ChatGPT 生成的,代码如下:
import boto3
import os
import json

def lambda_handler(event, context):

    # Initialize the EC2 client
    ec2 = boto3.client('ec2')

    # Input parameters
    client_vpn_endpoint_id = '<Your Client VPN endpoint ID>'
    subnet_id = '<Your subnet ID for associating>'

    try:
        # Describe the Client VPN endpoint to check its status
        endpoint_status_response = ec2.describe_client_vpn_endpoints(
            ClientVpnEndpointIds=[client_vpn_endpoint_id]
        )

        endpoint_status = endpoint_status_response['ClientVpnEndpoints'][0]['Status']['Code']
        print(f"Client VPN Endpoint Status: {endpoint_status}")

        # Check if the status is 'pending-associate'
        if endpoint_status.lower() == 'pending-associate':
            # Associate the Client VPN endpoint with the target subnet
            response = ec2.associate_client_vpn_target_network(
                ClientVpnEndpointId=client_vpn_endpoint_id,
                SubnetId=subnet_id
            )

            # Return response details
            return {
                'statusCode': 200,
                'headers': {
                    'Content-Type': 'application/json'
                },
                'body': json.dumps({
                    'Message': 'Successfully associated Client VPN endpoint with subnet.',
                    'AssociationId': response['AssociationId'],
                    'Status': response['Status']
                })
            }
        else:
            return {
                'statusCode': 400,
                'headers': {
                    'Content-Type': 'application/json'
                },
                'body': json.dumps({
                    'Message': f'Client VPN Endpoint is not in pending-associate state. Current status: {endpoint_status}'
                })
            }

    except Exception as e:
        print(f"Error associating Client VPN endpoint: {str(e)}")
        return {
            'statusCode': 500,
            'headers': {
                'Content-Type': 'application/json'
            },
            'body': json.dumps({
                'Message': 'Failed to associate Client VPN endpoint.',
                'Error': str(e)
            })
        }
ALB 创建
由于创建 ALB 不是本文的重点,因此我们将从这里开始使用 AWS CLI 命令进行配置。
- 使用以下 AWS CLI 命令创建目标组。
(注意:如果通过管理控制台创建目标组,资源级别的策略会自动生成,因此第三条 AWS CLI 命令可以省略。)
LAMBDA_FUNCTION_NAME="AWSClientVPN-AssociatingSubnets"

# Create a target group
TARGET_GROUP_ARN=$(aws elbv2 create-target-group \
    --name AssociatingSubnets-alb \
    --target-type lambda \
    --query 'TargetGroups[0].TargetGroupArn' \
    --output text)

# Get the ARN of the Lambda function
LAMBDA_FUNCTION_ARN=$(aws lambda get-function \
    --function-name $LAMBDA_FUNCTION_NAME \
    --query 'Configuration.FunctionArn' \
    --output text)

# Add permission for the ALB to invoke the Lambda function
aws lambda add-permission \
    --function-name $LAMBDA_FUNCTION_NAME \
    --statement-id "AWS-ALB_Invoke-targetgroup" \
    --action lambda:InvokeFunction \
    --principal elasticloadbalancing.amazonaws.com \
    --source-arn $TARGET_GROUP_ARN

# Register the Lambda function
aws elbv2 register-targets \
    --target-group-arn $TARGET_GROUP_ARN \
    --targets Id=$LAMBDA_FUNCTION_ARN
- 使用以下 AWS CLI 命令创建一个允许 HTTPS 流量的 ALB 安全组。
VPC_ID="<Your VPC ID>"

# Create a security group for the ALB
SECURITY_GROUP_ID=$(aws ec2 create-security-group \
    --group-name ALB-sg \
    --description "Security group for ALB allowing HTTPS traffic" \
    --vpc-id $VPC_ID \
    --query 'GroupId' \
    --output text)

# Add an inbound rule to allow HTTPS traffic
aws ec2 authorize-security-group-ingress \
    --group-id $SECURITY_GROUP_ID \
    --protocol tcp \
    --port 443 \
    --cidr 0.0.0.0/0
- 接下来使用以下 AWS CLI 命令创建 ALB。
需要为 ALB 指定至少两个可用区 (AZ) 的子网。
PUBLIC_SUBNET1="<1st public subnet ID>"
PUBLIC_SUBNET2="<2nd public subnet ID>"

# Create an ALB
LOAD_BALANCER_ARN=$(aws elbv2 create-load-balancer \
    --name AssociatingSubnets-alb \
    --subnets $PUBLIC_SUBNET1 $PUBLIC_SUBNET2 \
    --security-groups $SECURITY_GROUP_ID \
    --scheme internet-facing \
    --type application \
    --ip-address-type ipv4 \
    --query 'LoadBalancers[0].LoadBalancerArn' \
    --output text)
- 使用以下 AWS CLI 命令创建 HTTPS 监听器。
需要使用 创建 Cognito [步骤 2] 中确认的 用户池 ID 和 Cognito 域名。
DOMAIN="api.awsexample.com"
USER_POOL_ID="ap-northeast-1_eXAMPLE"
COGNITO_DOMAIN="https://ap-northeast-1example.auth.ap-northeast-1.amazoncognito.com"
COGNITO_DOMAIN_PREFIX=$(echo $COGNITO_DOMAIN | awk -F[/:] '{print $4}' | cut -d. -f1)

# Get the ARN of the ACM certificate
CERTIFICATE_ARN=$(aws acm list-certificates \
    --query "CertificateSummaryList[?DomainName=='${DOMAIN}'].CertificateArn" \
    --output text)

# Get the ARN of the Cognito User Pool
COGNITO_USER_POOL_ARN=$(aws cognito-idp describe-user-pool \
    --user-pool-id $USER_POOL_ID \
    --query 'UserPool.Arn' \
    --output text)

# Get the App Client ID for the User Pool
COGNITO_APP_CLIENT_ID=$(aws cognito-idp list-user-pool-clients \
    --user-pool-id $USER_POOL_ID \
    --query 'UserPoolClients[0].ClientId' \
    --output text)

# Create an HTTPS listener with Cognito authentication
aws elbv2 create-listener \
    --load-balancer-arn $LOAD_BALANCER_ARN \
    --protocol HTTPS \
    --port 443 \
    --certificates CertificateArn=$CERTIFICATE_ARN \
    --default-actions Type=authenticate-cognito,Order=1,AuthenticateCognitoConfig="{UserPoolArn=$COGNITO_USER_POOL_ARN,UserPoolClientId=$COGNITO_APP_CLIENT_ID,UserPoolDomain=$COGNITO_DOMAIN_PREFIX}" Type=forward,Order=2,TargetGroupArn=$TARGET_GROUP_ARN
- 最后,为了将
api.awsexample.com的流量路由到 ALB,需要在 Route 53 主机区域中创建一条记录。
在此之前,请参考官方文档确认 ALB DNS 的主机区域 ID。
服务端点
https://docs.aws.amazon.com/zh_cn/general/latest/gr/elb.html
区域名称 区域 终端节点 Route 53 托管区域 ID(Application Load Balancer、经典负载均衡器) Route 53 托管区域 ID(网络负载均衡器) 美国东部(弗吉尼亚州北部) us-east-1 elasticloadbalancing.us-east-1.amazonaws.com
elasticloadbalancing-fips.us-east-1.amazonaws.comZ35SXDOTRQ7X7K Z26RNL4JYFTOTI
HOSTEDZONE_ID_ALB="Z35SXDOTRQ7X7K"

# Get hosted zone ID of awsexample.com
HOSTEDZONE_ID_R53=$(aws route53 list-hosted-zones-by-name \
    --dns-name awsexample.com \
    --query "HostedZones[0].Id" \
    --output text)

# Get domain name of ALB
ALB_DNS=$(aws elbv2 describe-load-balancers \
    --query "LoadBalancers[?LoadBalancerName=='AssociatingSubnets-alb'].DNSName" \
    --output text)

# Create record for ALB
aws route53 change-resource-record-sets \
    --hosted-zone-id $HOSTEDZONE_ID_R53 \
    --change-batch '{
      "Comment": "Creating ALB alias for api.awsexample.com",
      "Changes": [
        {
          "Action": "UPSERT",
          "ResourceRecordSet": {
            "Name": "api.awsexample.com",
            "Type": "A",
            "AliasTarget": {
              "HostedZoneId": "'"$HOSTEDZONE_ID_ALB"'",
              "DNSName": "'"$ALB_DNS"'",
              "EvaluateTargetHealth": false
            }
          }
        }
      ]
    }'
用户方面的步骤
员工将通过 Lambda 函数关联 AWS Client VPN 终端节点。
具体步骤如下:
- 从浏览器访问以下 URL:
URL: https://api.awsexample.com - 使用注册在 Active Directory 中的用户 ID 和密码登录。
按照上述步骤,AWS Client VPN 终端节点将完成关联。
如果是首次登录,由于 IAM Identity Center 默认启用了 MFA 注册,因此需要注册 MFA 设备。首次登录时,请按以下步骤操作:
- 在您的智能手机上安装 Google Authenticator(MFA 身份验证应用)。
[Google Play / App Store] - 按照 注册 MFA 设备 的流程,选择身份验证应用并完成以下操作:
- 显示 QR 码。
- 在智能手机上启动 Google Authenticator。
- 点击应用右下角的 “+” 按钮并扫描 QR 码。
- 输入应用中 AWS SSO 部分显示的 6 位身份验证代码。
员工被通知在使用 AWS Client VPN 时遵循上述步骤。
这将最大限度减少关联所需时间并降低成本。
我们还计划实现自动解除关联的机制,这将在下一篇文章中介绍。


