
배경
사내 네트워크와 AWS를 VPN으로 연결하기 위해, 드디어 VPN 라우터를 지급받았습니다.
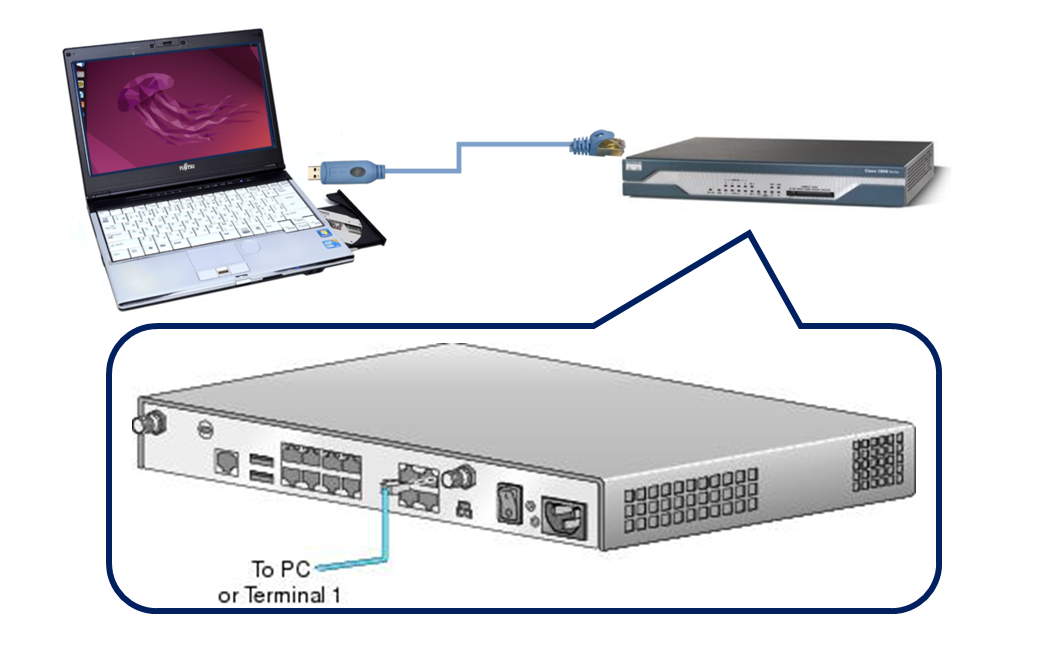
지난번에는 라우터를 PC에 연결해야 한다는 것을 알게 되었고, Ubuntu 노트북으로 시리얼 연결을 시도했습니다.
구체적인 방법은 아래 기사에서 소개하고 있으니 관심이 있으시면 참고하세요.

이제 설정을 시작하려고 했는데, 이전 설정이 그대로 남아있는 상황이었습니다.
초기화를 시도하려 했지만, 매뉴얼도 없고 공식 페이지에서도 지원하지 않는지 관련 페이지가 삭제된 상태였습니다.
방법
익숙한 사람에게는 간단할 수도 있겠지만, 앞으로를 위해 메모로서 절차를 남겨두기로 했습니다.
회사에서는 공식적으로 공유되지 않았지만, 제 후임 직원에게는 이 사이트를 알려줄 예정입니다.
구성은 이전과 동일하며, 다음과 같습니다:
- 노트북 (Ubuntu Desktop 22.04 LTS)
- VPN 라우터 (Cisco 1812J)
- USB RJ45 콘솔 케이블
초기화 절차
- 시리얼 케이블의 USB 포트를 확인하고 Cisco 1812J에 연결합니다.
guest@ubuntu:∼$ sudo dmesg | grep ttyUSB
[ 34.739950] usb 1-1.3.4: FTDI USB Serial Device converter now attached to ttyUSB0
[ 34.996889] usb 1-1.3.1: pl2303 converter now attached to ttyUSB1
guest@ubuntu:∼$ cu --speed 9600 --parity=none --line /dev/ttyUSB0
Connected.

Router1>- 사용자 모드(프롬프트 시작이
>인 상태)에서는 기본적인 모니터링 명령만 실행할 수 있습니다. 초기화를 위해 특권 모드(프롬프트 시작이#인 상태)로 전환합니다.
특권 모드에서는 권한이 높은 명령을 실행할 수 있습니다.
이번에는 비밀번호가cisco였습니다.
Router1> enable
Password: cisco- 기존 설정을 삭제하고 라우터를 재시작합니다.
Router1# erase startup-config
Erasing the nvram filesystem will remove all configuration files! Continue? [confirm] <Press ENTER key>
[OK]
Erase of nvram: complete
*Apr  1 13:09:39.943: %SYS-7-NV_BLOCK_INIT: Initialized the geometry of nvram
Router1# reload
Proceed with reload? [confirm] <Press ENTER key>
*Apr 12 13:56:57.875: %SYS-5-RELOAD: Reload requested by console. Reload Reason: Reload Command.- 이후 자동으로 초기 설정이 시작되며, 항목에 따라 설정을 완료합니다. 텍스트를 입력하거나 Enter 키를 눌러야 합니다. 주요 설정은 다음과 같습니다:
- 라우터 이름: Router1
- 특권 모드 암호화 비밀번호: cisco
- 특권 모드 일반 비밀번호: cisco
- 텔넷 로그인 비밀번호: cisco
- 사내 네트워크를 연결할 인터페이스: FastEthernet1
- FastEthernet1 IP 주소: 192.168.101.1
- FastEthernet1 서브넷 마스크: 255.255.255.0 (/24)
         --- System Configuration Dialog ---

Would you like to enter the initial configuration dialog? [yes/no]: yes

At any point you may enter a question mark '?' for help.
Use ctrl-c to abort configuration dialog at any prompt.
Default settings are in square brackets '[]'.

Basic management setup configures only enough connectivity
for management of the system, extended setup will ask you
to configure each interface on the system

Would you like to enter basic management setup? [yes/no]: yes
Configuring global parameters:

  Enter host name [Router]: Router1 <- YOUR ROUTER NAME

  The enable secret is a password used to protect access to
  privileged EXEC and configuration modes. This password, after
  entered, becomes encrypted in the configuration.
  Enter enable secret: cisco <- enable PASSWORD ENCRYPTED

  The enable password is used when you do not specify an
  enable secret password, with some older software versions, and
  some boot images.
  Enter enable password: cisco <- enable PASSWORD
% Please choose a password that is different from the enable secret
  Enter enable password: cisco <- enable PASSWORD AGAIN

  The virtual terminal password is used to protect
  access to the router over a network interface.
  Enter virtual terminal password: cisco <- PASSWORD FOR telnet LOGIN
  Configure SNMP Network Management? [yes]: <Press ENTER key>
    Community string [public]: <Press ENTER key>

Current interface summary

Any interface listed with OK? value "NO" does not have a valid configuration

Interface                  IP-Address      OK? Method Status                Protocol
BRI0                       unassigned      NO  unset  down                  down
BRI0:1                     unassigned      YES unset  down                  down
BRI0:2                     unassigned      YES unset  down                  down
FastEthernet0              192.168.1.10    YES DHCP   up                    up
FastEthernet1              unassigned      NO  unset  up                    down
FastEthernet2              unassigned      YES unset  initializing          down
FastEthernet3              unassigned      YES unset  initializing          down
FastEthernet4              unassigned      YES unset  initializing          down
FastEthernet5              unassigned      YES unset  initializing          down
FastEthernet6              unassigned      YES unset  initializing          down
FastEthernet7              unassigned      YES unset  initializing          down
FastEthernet8              unassigned      YES unset  initializing          down
FastEthernet9              unassigned      YES unset  initializing          down
Vlan1                      unassigned      YES unset  up                    down

Enter interface name used to connect to the
management network from the above interface summary: FastEthernet1 <- INTERFACE TO CONFIGURE

Configuring interface FastEthernet1:
  Use the 100 Base-TX (RJ-45) connector? [yes]: <Press ENTER key>
  Operate in full-duplex mode? [no]: <Press ENTER key>
  Configure IP on this interface? [yes]: <Press ENTER key>
    IP address for this interface: 192.168.101.1 <- IP ADDRESS OF INTERFACE
    Subnet mask for this interface [255.255.255.0] : <Press ENTER key>
    Class C network is 192.168.101.0, 24 subnet bits; mask is /24

The following configuration command script was created:

hostname Router1
enable secret 5 $1$F3nC$LiNukzm2zG5JG1GGhg7mE.
enable password ********
line vty 0 4
password ********
snmp-server community public
!
no ip routing

!
interface FastEthernet0
shutdown
no ip address
!
interface FastEthernet1
no shutdown
media-type 100BaseX
half-duplex
ip address 192.168.101.1 255.255.255.0
!
interface FastEthernet2
shutdown
no ip address
!
interface FastEthernet3
shutdown
no ip address
!
interface FastEthernet4
shutdown
no ip address
!
interface FastEthernet5
shutdown
no ip address
!
interface FastEthernet6
shutdown
no ip address
!
interface FastEthernet7
shutdown
no ip address
!
interface FastEthernet8
shutdown
no ip address
!
interface FastEthernet9
shutdown
no ip address
!
interface Vlan1
shutdown
no ip address
!
end


[0] Go to the IOS command prompt without saving this config.
[1] Return back to the setup without saving this config.
[2] Save this configuration to nvram and exit.

Enter your selection [2]: <Press ENTER key>
The enable password you have chosen is the same as your enable secret.
This is not recommended.  Re-enter the enable password.

media-type 100BaseX
 ^
% Invalid input detected at '^' marker.

Building configuration...
Use the enabled mode 'configure' command to modify this configuration.


Press RETURN to get started!
초기 설정은 여기서 완료됩니다.
추가 설정
필수는 아니지만, 이후 작업을 원활히 진행하기 위해 다음 설정을 권장합니다.
특권 모드에서 설정 모드로 진입합니다.
Router1> enable
Password: cisco
Router1# conf t
Enter configuration commands, one per line.  End with CNTL/Z.
Router1(config)#- 기본적으로 명령어를 잘못 입력하면 이를 IP 주소로 변환하려 시도합니다. 이를 비활성화합니다.
Router1(config)# no ip domain lookup - 기본적으로 장치는 주기적으로 TFTP 통신으로 255.255.255.255에 연결을 시도합니다. 연결할 수 없어
%Error opening tftp://255.255.255.255오류가 출력되는데, 이를 비활성화합니다.
Router1(config)# no service config- 로그가 주기적으로 출력되는데, 이는 명령어 입력을 방해할 수 있습니다. 로그 출력이 명령어 입력을 방해하지 않도록 설정합니다.
Router1(config)# line console 0
Router1(config-line)# logging synchronous- 특권 모드의 타임아웃을 30분 0초로 변경합니다.
Router1(config)# line console 0
Router1(config-line)# exec-timeout 30 0
설정은 이상입니다.
아래 명령어를 통해 설정 모드와 특권 모드에서 빠져나올 수 있습니다.
Router1(config-line)# exit
Router1(config)# exit
*Apr  6 12:27:49.547: %SYS-5-CONFIG_I: Configured from console by console
Router1# disable
Router1>
필요할 경우 추천 설정을 계속 추가할 예정입니다. 매뉴얼이 없고 인터넷 정보를 정리한 것뿐이지만, Cisco 1812J 초기화를 완료했습니다.
이제 AWS와 VPN으로 연결하기 위해 계속 설정을 진행할 계획이며, 관련 내용은 다음 기사에서 다룰 예정입니다.