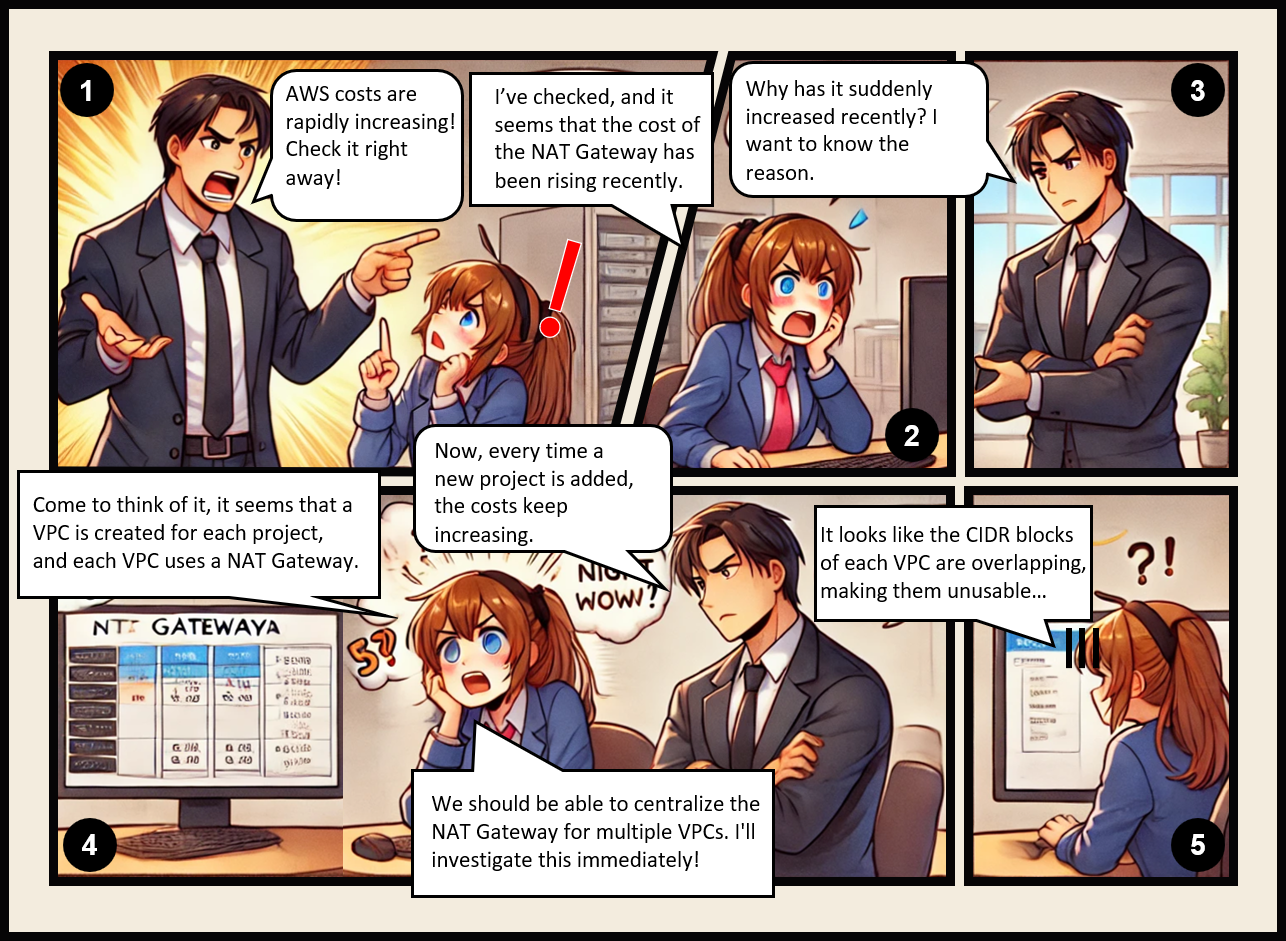
The background of this article stems from a scenario where assigning AWS users to employees resulted in the proliferation of multiple VPCs and NAT Gateways.
Although this topic is not the main focus of this article, please check out the following reference if you’re interested.
Updated on 2024/12/04
AWS announces access to VPC resources over AWS PrivateLink
You can now access VPC resources without using an NLB via AWS PrivateLink.
For details, refer to the official article above.
At our company, we initially used NLB, but this update prompted us to transition to a method without NLB.
Background
We have separate VPCs for each project.
We have a requirement to use a NAT gateway as a method of connection to the Internet, but as the number of VPCs has increased, the cost has become a bottleneck.
Therefore, we considered connecting multiple VPCs with Transit Gateways and consolidating NAT gateways for Internet egress, as shown below;
Using the NAT gateway for centralized IPv4 egress
https://docs.aws.amazon.com/whitepapers/latest/building-scalable-secure-multi-vpc-network-infrastructure/using-nat-gateway-for-centralized-egress.html
However, we discovered that in our environment, the Transit Gateway could not connect between VPCs.
Cause
Although it was our fault, we only paid out IAM users for each project and did not have any particular IP address banding arrangements in place.
As a result, many VPCs had overlapping CIDRs, and we were unable to attach each VPC to the Transit Gateway.
(Or, more accurately, they could be attached, but the return routes specified in the Transit Gateway route table were duplicated in multiple VPCs)
Can I connect Amazon VPCs with identical CIDRs?
https://aws.amazon.com/transit-gateway/faqs/?nc1=h_ls
AWS Transit Gateway doesn’t support routing between Amazon VPCs with identical CIDRs. If you attach a new Amazon VPC that has a CIDR which is identical to an already attached Amazon VPC, AWS Transit Gateway will not propagate the new Amazon VPC route into the AWS Transit Gateway route table.
I thought about using a private NAT gateway to translate to a non-overlapping IP address as shown below.
However, this method would end up using a private NAT gateway in each VPC, which would not meet the cost savings objective.
Enable communication between overlapping networks
https://docs.aws.amazon.com/vpc/latest/userguide/nat-gateway-scenarios.html#private-nat-overlapping-networks
Method
Fortunately, the primary use of the NAT gateways in each project was for Internet communication over HTTP/HTTPS.
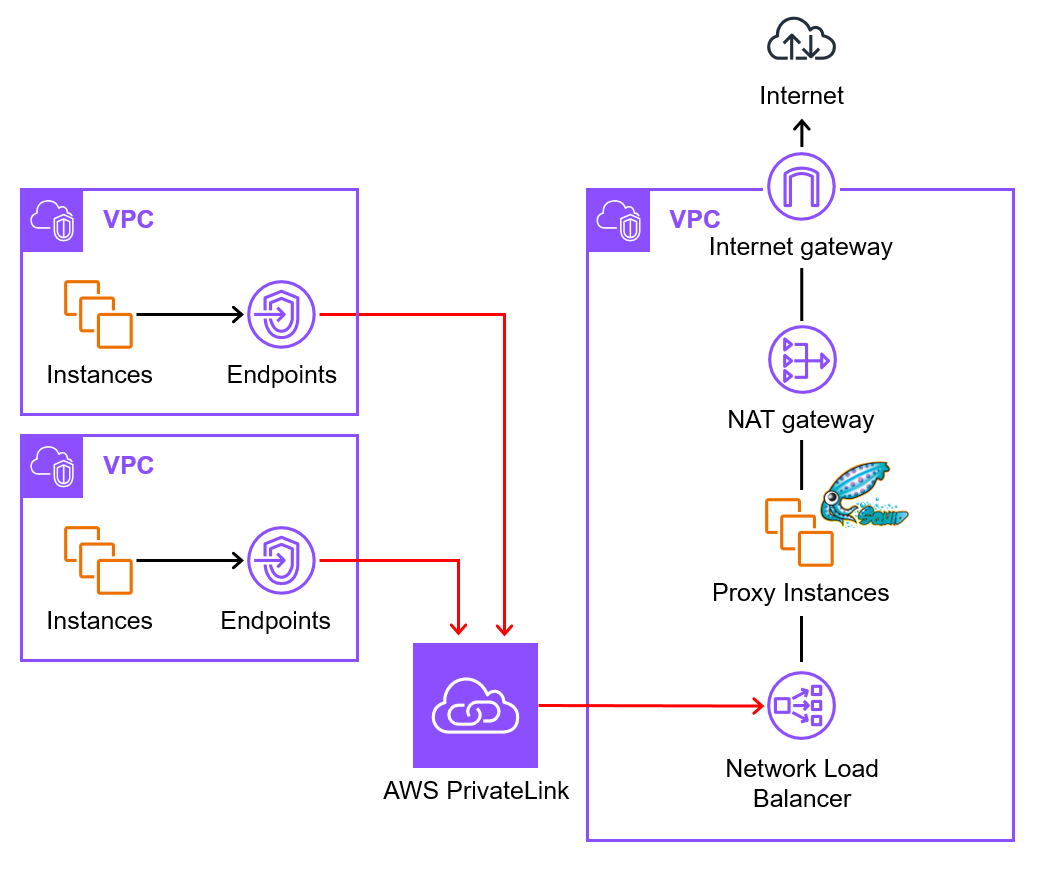
Therefore, we used AWS PrivateLink and a Proxy server to aggregate the Internet exits via the NAT gateway as a configuration to meet this requirement.
With AWS PrivateLink, communication is possible even if IP address ranges between VPCs overlap.
The configuration is as follows.

In this diagram, only four source VPCs are shown, but in reality, there are many more VPCs.
Additionally, by deploying NAT Gateways or Proxy Instances in each AZ within a region, it is possible to achieve higher availability operations.
Updated on 2024/12/04
For reference, I’m leaving the configuration diagram from when NLB was still required.
Previously, traffic from PrivateLink was received by the NLB and routed to the target.
With the latest update, it seems that traffic from PrivateLink is now received by the Resource Gateway and routed to resources specified in the Resource Configuration.
Configuration Diagram Before NLB

Administrator’s Procedure
First, we will start by creating a VPC.
Create VPC
- Create the VPC and subnets from the following URL:
https://us-east-1.console.aws.amazon.com/vpcconsole/home?region=us-east-1#CreateVpc:createMode=vpcWithResources - Create using the following settings (leave except for the underlined items as default):
- Resources to Create: VPC and more
- This will also create the subnets.
- Name tag auto-generation: ☑️ Auto-generate “Proxy”
- VPC and subnet names will be automatically generated. They can be changed later.
- IPv4 CIDR block: 10.0.0.0/16
- This is the private IP address range for the VPC. It cannot be changed later.
- It has nothing to do with the public IP address when going out to the Internet.
- Number of Availability Zones (AZs): 2
- Number of AWS data centers for subnet placement.
- Number of public subnets: 2
- Number of subnets that can access the internet.
- Number of private subnets: 2
- Number of subnets that cannot access the internet.
- NAT gateways ($): In 1 AZ
- Configure whether to place a NAT gateway in each AZ.
- It incurs costs per gateway, so one is created in a single AZ.
- (The ($) symbol indicates that a fee will be charged?)
- VPC endpoints: S3 Gateway
- Allows direct access from the VPC to S3, contributing to cost savings.
- The installation itself is free of charge and seems to contribute to the reduction of the fee, so I’ll leave it on as is.
- Resources to Create: VPC and more
Image

Preparing the Proxy Server
Since I’m familiar with the process, I will proceed using AWS CLI commands.
- Use the following AWS CLI command to create an instance profile for connecting to an EC2 instance via Session Manager.
# Create IAM role
aws iam create-role \
    --role-name SSMRole \
    --assume-role-policy-document '{
        "Version": "2012-10-17",
        "Statement": [
            {
                "Effect": "Allow",
                "Principal": {
                    "Service": "ec2.amazonaws.com"
                },
                "Action": "sts:AssumeRole"
            }
        ]
    }'

# Attach IAM policy for SSM
aws iam attach-role-policy \
    --role-name SSMRole \
    --policy-arn arn:aws:iam::aws:policy/AmazonSSMManagedInstanceCore

# Create instance profile
aws iam create-instance-profile \
    --instance-profile-name SSMRole

# Add IAM role to instance profile
aws iam add-role-to-instance-profile \
    --instance-profile-name SSMRole \
--role-name SSMRole- Use the following AWS CLI command to create a security group for the Proxy instance, with rules allowing traffic from the Resource Gateway.
※ Outbound rules are created by default, so no additional configuration is required.
| Source | Protocol | Port |
| 10.0.0.0/16 (VPC CIDR) | All | All |
| Destination | Protocol | Port |
| 0.0.0.0/0 | All | All |
# Get VPC ID
VPC_ID=$(aws ec2 describe-vpcs \
    --filters "Name=tag:Name,Values=Proxy-vpc" \
    --query "Vpcs[].VpcId" \
    --output text)

# Create a security group for proxy instance
SECURITY_GROUP_ID=$(aws ec2 create-security-group \
    --group-name Proxy-sg \
    --description "Security group for proxy instance" \
    --vpc-id $VPC_ID \
    --query 'GroupId' \
    --output text)

# Add an inbound rule to allow all traffic from VPC
aws ec2 authorize-security-group-ingress \
    --group-id $SECURITY_GROUP_ID \
    --protocol -1 \
--cidr 10.0.0.0/16- Use the following AWS CLI command to launch an EC2 instance with this security group in a private subnet.
# Get Amazon Linux 2 AMI ID
AMI_ID=$(aws ec2 describe-images \
    --owners amazon \
    --filters "Name=name,Values=amzn2-ami-hvm-2.0.*-x86_64-gp2" \
    --query 'sort_by(Images, &CreationDate)[-1].ImageId' \
    --output text)

# Get Subnet ID for running proxy instance
SUBNET_ID=$(aws ec2 describe-subnets \
    --filters "Name=tag:Name,Values=Proxy-subnet-private1-*" \
    --query "Subnets[].SubnetId" \
    --output text)

# Run EC2 instance for proxy
aws ec2 run-instances \
    --image-id $AMI_ID \
    --count 1 \
    --instance-type t2.micro \
    --iam-instance-profile Name=SSMRole \
    --security-group-ids $SECURITY_GROUP_ID \
    --subnet-id $SUBNET_ID \
--tag-specifications 'ResourceType=instance,Tags=[{Key=Name,Value=ProxyInstance}]'- Use the following AWS CLI command to connect to the EC2 instance via Session Manager.
# Get EC2 instance ID
EC2_ID=$(aws ec2 describe-instances \
    --filters "Name=tag:Name,Values=ProxyInstance" \
    --query "Reservations[].Instances[].InstanceId" \
    --output text)

# Start connect by Session Manager
aws ssm start-session --target $EC2_ID- Run the following commands to set up the Proxy server.
This guide uses minimal settings, but customize them as needed for your use case.
## Bellow command is at Session Manager.
# Ready for operating proxy
sh-4.2$ sudo yum -y install squid
sh-4.2$ sudo systemctl start squid
sh-4.2$ sudo systemctl enable squid
sh-4.2$ sudo lsof -i:3128
COMMAND  PID  USER   FD   TYPE DEVICE SIZE/OFF NODE NAME
squid   3551 squid   11u  IPv6  33657      0t0  TCP *:squid (LISTEN)
Creating the Resource Gateway
Once the Resource Gateway is created, an ENI will be generated in the specified subnets.
Traffic from PrivateLink will flow through this ENI.
- Use the following AWS CLI command to create a security group for the Resource Gateway, with rules allowing traffic from the Resource Gateway.
※ Outbound rules are created by default, so no additional configuration is required.
| Source | Protocol | Port |
| 0.0.0.0/0 | All | All |
| Destination | Protocol | Port |
| 0.0.0.0/0 | All | All |
# Get VPC ID
VPC_ID=$(aws ec2 describe-vpcs \
    --filters "Name=tag:Name,Values=Proxy-vpc" \
    --query "Vpcs[].VpcId" \
    --output text)

# Create a security group for resource gateway
SECURITY_GROUP_ID=$(aws ec2 create-security-group \
    --group-name ResourceGateway-sg \
    --description "Security group for resource gateway" \
    --vpc-id $VPC_ID \
    --query 'GroupId' \
    --output text)

# Add an inbound rule to allow all traffic
aws ec2 authorize-security-group-ingress \
    --group-id $SECURITY_GROUP_ID \
    --protocol -1 \
--cidr 0.0.0.0/0- Create the Resource Gateway from the following URL:
https://us-east-1.console.aws.amazon.com/vpcconsole/home?region=us-east-1#CreateResourceGateway - Configure as follows:
- Resource gateway name: proxy-rgw
- IP address type: IPv4
- VPC: Proxy-vpc
- ☑️ us-east-1a: Proxy-subnet-private1-us-east-1a
- ☑️ us-east-1c: Proxy-subnet-private2-us-east-1c
- An ENI will be created in these subnets.
- Security groups: ResourceGateway-sg
- This is the security group applied to the created ENI.
- Traffic from PrivateLink to the resources must be allowed.
Image

Creating the Resource Configuration
Here, you will specify the routing destination for traffic coming through PrivateLink.
Traffic on specified port numbers passing through the designated Resource Gateway will be routed to the specified resource.
- Create the Resource Configuration from the following URL:
https://us-east-1.console.aws.amazon.com/vpcconsole/home?region=us-east-1#CreateResourceConfig: - Configure as follows:
- Name: Proxy-conf
- Configuration type: ◉ Resource
- Type: Single
- Protocol: TCP
- Resource gateway: proxy-rgw
- Resource type: ◉ DNS resource
- Domain name: proxy.awsexample.com
- The domain name resolves to the Proxy Instance's IP address.
- As noted later, I thought specifying the domain name here might enable private DNS, but it doesn’t seem to work that way.
- You can also specify it by IP address.
- IP address type: IPv4
- Port ranges:
- Lower bound: 1
- Upper bound: 65535
- Allow association with shareable service networks: ◉ Allow
- This likely refers to whether this configuration can be associated with a "Service Network" in Amazon VPC Lattice.
We’re not using a "Service Network" this time, so we’ll leave it at the default.
- This likely refers to whether this configuration can be associated with a "Service Network" in Amazon VPC Lattice.
Image

As mentioned later, unlike with VPC Endpoint Services using NLB, I could not find any items to verify domain ownership, and the above configuration did not set a private DNS name for the VPC Endpoint.
Additionally, while a domain name can be used to specify the destination resource, the domain name must point to the private IP address of the resource.
At present, there may be no way to use a publicly used domain name as a private DNS name.
User‘s Procedure
In each project, a VPC Endpoint was created on the VPC, and Proxy was configured.
Creating the VPC Endpoint
- Create the VPC Endpoint from the following URL:
https://us-east-1.console.aws.amazon.com/vpcconsole/home?region=us-east-1#CreateVpcEndpoint: - Configure as follows:
- Name tag - optional: Proxy-vpce
- Type: Resources - New
- Resource configurations: proxy-conf
- VPC: <Project VPC>
- DNS name: ☑️ Enable DNS name
- Subnets:
- ☑️ us-east-1a: <Project Subnet AZ-a>
- ☑️ us-east-1c: <Project Subnet AZ-c>
- Security groups: <Security Group ID>
- Rules to allow traffic from the communication source are required.
- In our company, we advise allowing all communication from the VPC CIDR.
Image

Proxy Configuration
When checking the created VPC Endpoint, the private DNS name appeared to be enabled, but no domain name was displayed.
It’s unclear whether enabling it is even possible, so for now, we decided to let each project check the private IP address and configure it.
- You can verify the private IP address using the VPC Endpoint ID via the following URL:
https://us-east-1.console.aws.amazon.com/ec2/home?region=us-east-1#NIC:description=:VPC%20Endpoint%20Interface;v=3;$case=tags:false%5C,client:false;$regex=tags:false%5C,client:false - Please configure the Proxy settings on each communication source server.
So far, this configuration is working well.
However, assigning a unique domain name would simplify the process, so being able to use a private DNS name would be beneficial.
If you know of a method, please let us know via "Contact Us."
Additionally, there may be communication scenarios in the future that cannot be handled by Proxy.
In preparation for that, I plan to define the range of IP address usage for each project.


