
Background
To connect our internal network to AWS via VPN, we were finally provided with a VPN router.
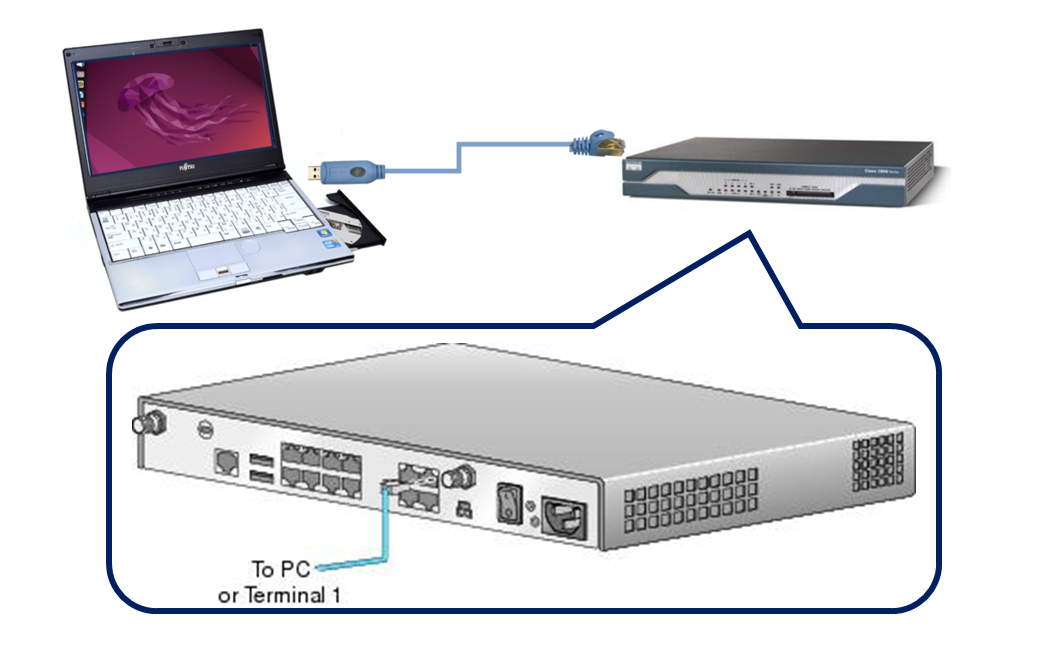
Previously, we discovered that the router needs to be connected to a computer, so we attempted to establish a serial connection using an Ubuntu laptop.
This process is documented in the article below, so feel free to refer to it if you're interested.

Now, I plan to start configuring the router, but it appears that previous settings remain on the device. Unfortunately, there was no manual, and the official support page seems to have been removed.
Method
While these steps might be straightforward for some, I’m documenting them as a reference for future use.
Although this guide is not officially shared within the company, I intend to pass it along to my successor.
The setup is the same as before:
- Laptop (Ubuntu Desktop 22.04 LTS)
- VPN Router (Cisco 1812J)
- USB RJ45 Console Cable
Initialization Steps
- Identify the USB port for the serial cable and connect it to the Cisco 1812J.
guest@ubuntu:∼$ sudo dmesg | grep ttyUSB
[ 34.739950] usb 1-1.3.4: FTDI USB Serial Device converter now attached to ttyUSB0
[ 34.996889] usb 1-1.3.1: pl2303 converter now attached to ttyUSB1
guest@ubuntu:∼$ cu --speed 9600 --parity=none --line /dev/ttyUSB0
Connected.

Router1>- In user mode (prompt starts with
>), only basic monitoring commands can be executed. To reset the settings, switch to privileged mode (prompt starts with#), where commands with higher authority can be executed.
The password for this session wascisco.
Router1> enable
Password: cisco- Delete existing configurations and reload the router.
Router1# erase startup-config
Erasing the nvram filesystem will remove all configuration files! Continue? [confirm] <Press ENTER key>
[OK]
Erase of nvram: complete
*Apr  1 13:09:39.943: %SYS-7-NV_BLOCK_INIT: Initialized the geometry of nvram
Router1# reload
Proceed with reload? [confirm] <Press ENTER key>
*Apr 12 13:56:57.875: %SYS-5-RELOAD: Reload requested by console. Reload Reason: Reload Command.- Initial setup will start automatically; follow the prompts to complete the configuration. You'll need to input text or press the Enter key. The main configurations are as follows:
- Router name: Router1
- Privileged mode encrypted password: cisco
- Privileged mode plain-text password: cisco
- Telnet login password: cisco
- Interface connecting to internal network: FastEthernet1
- FastEthernet1 IP address: 192.168.101.1
- FastEthernet1 subnet mask: 255.255.255.0 (/24)
         --- System Configuration Dialog ---

Would you like to enter the initial configuration dialog? [yes/no]: yes

At any point you may enter a question mark '?' for help.
Use ctrl-c to abort configuration dialog at any prompt.
Default settings are in square brackets '[]'.

Basic management setup configures only enough connectivity
for management of the system, extended setup will ask you
to configure each interface on the system

Would you like to enter basic management setup? [yes/no]: yes
Configuring global parameters:

  Enter host name [Router]: Router1 <- YOUR ROUTER NAME

  The enable secret is a password used to protect access to
  privileged EXEC and configuration modes. This password, after
  entered, becomes encrypted in the configuration.
  Enter enable secret: cisco <- enable PASSWORD ENCRYPTED

  The enable password is used when you do not specify an
  enable secret password, with some older software versions, and
  some boot images.
  Enter enable password: cisco <- enable PASSWORD
% Please choose a password that is different from the enable secret
  Enter enable password: cisco <- enable PASSWORD AGAIN

  The virtual terminal password is used to protect
  access to the router over a network interface.
  Enter virtual terminal password: cisco <- PASSWORD FOR telnet LOGIN
  Configure SNMP Network Management? [yes]: <Press ENTER key>
    Community string [public]: <Press ENTER key>

Current interface summary

Any interface listed with OK? value "NO" does not have a valid configuration

Interface                  IP-Address      OK? Method Status                Protocol
BRI0                       unassigned      NO  unset  down                  down
BRI0:1                     unassigned      YES unset  down                  down
BRI0:2                     unassigned      YES unset  down                  down
FastEthernet0              192.168.1.10    YES DHCP   up                    up
FastEthernet1              unassigned      NO  unset  up                    down
FastEthernet2              unassigned      YES unset  initializing          down
FastEthernet3              unassigned      YES unset  initializing          down
FastEthernet4              unassigned      YES unset  initializing          down
FastEthernet5              unassigned      YES unset  initializing          down
FastEthernet6              unassigned      YES unset  initializing          down
FastEthernet7              unassigned      YES unset  initializing          down
FastEthernet8              unassigned      YES unset  initializing          down
FastEthernet9              unassigned      YES unset  initializing          down
Vlan1                      unassigned      YES unset  up                    down

Enter interface name used to connect to the
management network from the above interface summary: FastEthernet1 <- INTERFACE TO CONFIGURE

Configuring interface FastEthernet1:
  Use the 100 Base-TX (RJ-45) connector? [yes]: <Press ENTER key>
  Operate in full-duplex mode? [no]: <Press ENTER key>
  Configure IP on this interface? [yes]: <Press ENTER key>
    IP address for this interface: 192.168.101.1 <- IP ADDRESS OF INTERFACE
    Subnet mask for this interface [255.255.255.0] : <Press ENTER key>
    Class C network is 192.168.101.0, 24 subnet bits; mask is /24

The following configuration command script was created:

hostname Router1
enable secret 5 $1$F3nC$LiNukzm2zG5JG1GGhg7mE.
enable password ********
line vty 0 4
password ********
snmp-server community public
!
no ip routing

!
interface FastEthernet0
shutdown
no ip address
!
interface FastEthernet1
no shutdown
media-type 100BaseX
half-duplex
ip address 192.168.101.1 255.255.255.0
!
interface FastEthernet2
shutdown
no ip address
!
interface FastEthernet3
shutdown
no ip address
!
interface FastEthernet4
shutdown
no ip address
!
interface FastEthernet5
shutdown
no ip address
!
interface FastEthernet6
shutdown
no ip address
!
interface FastEthernet7
shutdown
no ip address
!
interface FastEthernet8
shutdown
no ip address
!
interface FastEthernet9
shutdown
no ip address
!
interface Vlan1
shutdown
no ip address
!
end


[0] Go to the IOS command prompt without saving this config.
[1] Return back to the setup without saving this config.
[2] Save this configuration to nvram and exit.

Enter your selection [2]: <Press ENTER key>
The enable password you have chosen is the same as your enable secret.
This is not recommended.  Re-enter the enable password.

media-type 100BaseX
 ^
% Invalid input detected at '^' marker.

Building configuration...
Use the enabled mode 'configure' command to modify this configuration.


Press RETURN to get started!
Initial setup is now complete.
Additional Configurations
Though optional, the following configurations are recommended for smoother operation.
Enter configuration mode from privileged mode.
Router1> enable
Password: cisco
Router1# conf t
Enter configuration commands, one per line.  End with CNTL/Z.
Router1(config)#- By default, command typos are interpreted as potential IP addresses. Disable this feature.
Router1(config)# no ip domain lookup - The router periodically attempts TFTP communication with 255.255.255.255, leading to the error
%Error opening tftp://255.255.255.255. Disable this feature to avoid it.
Router1(config)# no service config- Logs are output periodically, which may interrupt command input. Adjust the log settings to prevent interference with commands.
Router1(config)# line console 0
Router1(config-line)# logging synchronous- Set the privileged mode timeout to 30 minutes and 0 seconds.
Router1(config)# line console 0
Router1(config-line)# exec-timeout 30 0
These settings can be exited using the commands below.
Router1(config-line)# exit
Router1(config)# exit
*Apr  6 12:27:49.547: %SYS-5-CONFIG_I: Configured from console by console
Router1# disable
Router1>
I’ll continue adding recommended settings as needed.
Though there was no manual and I mainly relied on online resources, I successfully initialized the Cisco 1812J.
From here, I’ll proceed to configure the connection to AWS via VPN, which will be covered in the next article.