This article is a continuation of the previous article.
For the setup steps so far, please refer to the article below.
Issue
Our company distributes iPads (10th generation) to employees as their work terminals.
For regular remote work, employees access WorkSpaces from their personal computers to carry out tasks.
Since the WorkSpaces client application can also be installed on iPads, we considered having employees connect to WorkSpaces from their iPads while on the go.
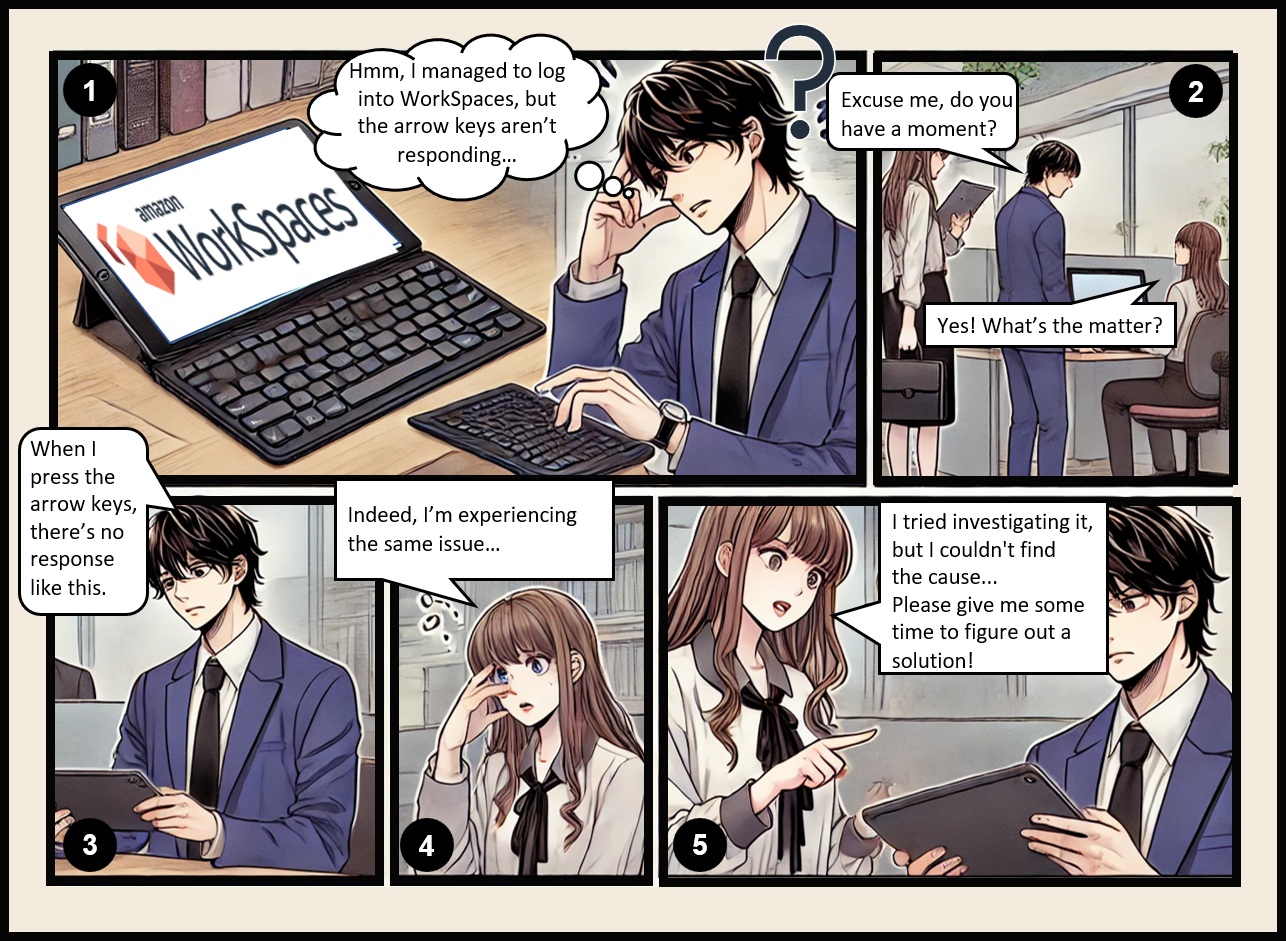
I assumed they would operate using the Magic Keyboard for iPad, but encountered an issue where, although logging into WorkSpaces was possible, the arrow keys were unresponsive.
Cause
Despite investigation, we could not identify the cause or find any reports of similar issues, so the exact reason remains unknown.
Since the issue occurs on multiple devices, it doesn't appear to be a device-specific malfunction, but no similar cases were found online.
For now, however, we managed to find a workaround, allowing the arrow keys to function, so we consider this an acceptable solution.
Workaround
In conclusion, we are connecting to WorkSpaces via RDP.
It appears that the issue may be caused by PCoIP, as using RDP to connect to WorkSpaces allows the arrow keys to function.
We referred to the following information;
How do I connect to my WorkSpace with RDP?
https://repost.aws/knowledge-center/connect-workspace-rdp
However, since we want to keep the subnet where WorkSpaces resides as a private subnet, we also decided to use AWS Client VPN.
Since Directory Service is already in use with WorkSpaces, it can be directly used for authentication with AWS Client VPN as well.
This is quite convenient, as employees can connect to AWS Client VPN using their usual passwords.
The architecture looks something like bellow;

Administrator's Procedure
Here are the steps I took to prepare the configuration:
Modify the Security Group for WorkSpaces
Update the security group for WorkSpaces to allow RDP communication from within the VPC.
Assuming the VPC CIDR is 10.0.0.0/16, the following AWS CLI command was executed.
# Get the ID of the security group for WorkSpaces
SECURITY_GROUP_ID=$(aws ec2 describe-security-groups \
    --query "SecurityGroups[?ends_with(GroupName, '_workspacesMembers')].GroupId" \
    --output text)

# Add an inbound rule to allow RDP traffic from VPC
aws ec2 authorize-security-group-ingress \
    --group-id "$SECURITY_GROUP_ID" \
    --protocol tcp \
    --port 3389 \
    --cidr 10.0.0.0/16
Create Route 53 hosted zone
When employees connect to WorkSpaces via RDP, they need to enter the IP address of the WorkSpaces.
Since only I, as the administrator, can check the IP addresses, it would be cumbersome to notify each employee individually.
Therefore, I decided to assign domain names automatically based on user IDs.
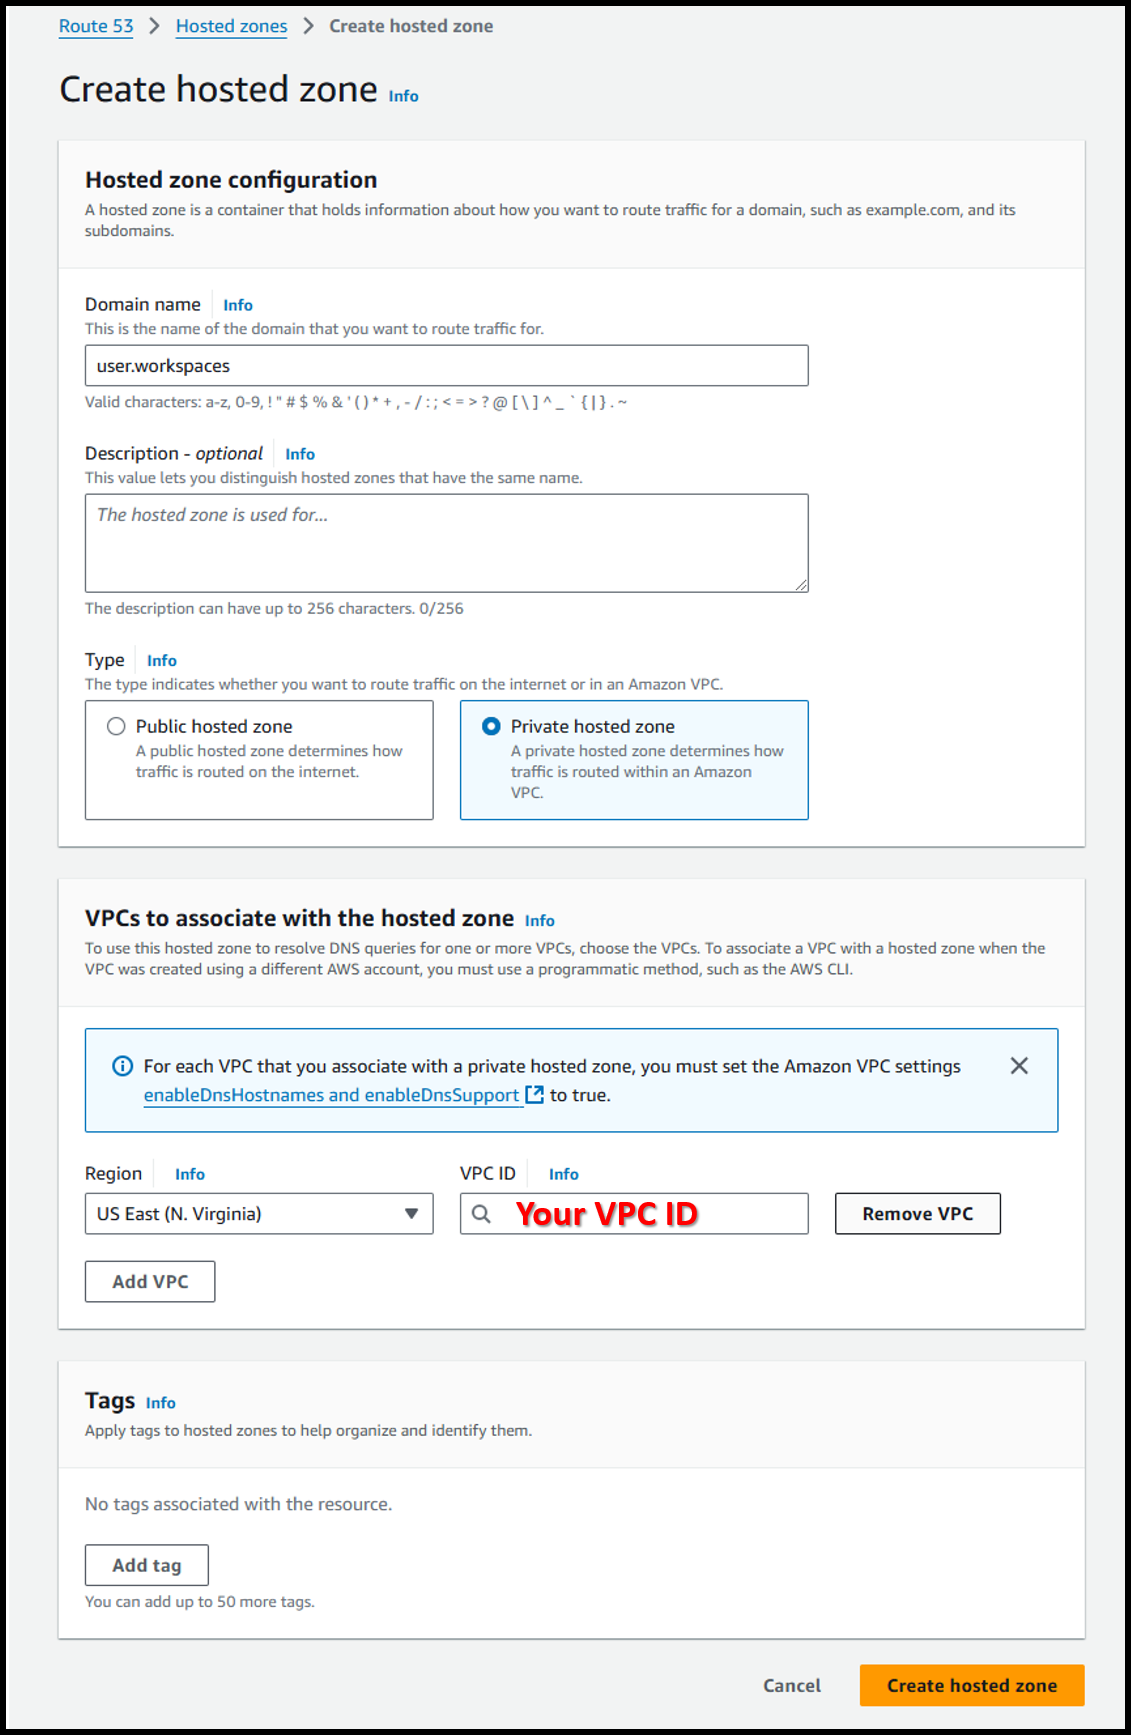
- Create a Route 53 hosted zone at the following URL:
https://us-east-1.console.aws.amazon.com/route53/v2/hostedzones#CreateHostedZone - Configure with the following settings:
- Domain name: user.workspaces
- Type: ⦿ Private hosted zone
- VPCs to associate with the hosted zone
- Region: US East (N. Virginia)
- VPC ID: VPC where WorkSpaces is located
Image
Create Lambda handler
Programs or actions that need to run simultaneously when connecting to the Client VPN can be configured with a Lambda handler.
Since WorkSpaces is relatively costly when active, it is set to AutoStop mode.
Therefore, the Lambda handler will start WorkSpaces each time it’s needed.
Additionally, the Lambda handler will register the WorkSpaces IP address with the Route 53 hosted zone.
- Run the following AWS CLI commands to create an IAM role for the Lambda function:
# Create IAM role
aws iam create-role \
    --role-name LambdaRole-WorkSpaces \
    --assume-role-policy-document '{
       "Version": "2012-10-17",
       "Statement": [
           {
               "Effect": "Allow",
               "Principal": {
                   "Service": "lambda.amazonaws.com"
               },
               "Action": "sts:AssumeRole"
           }
       ]
    }'

# Attach the IAM policy required for updating Route 53
aws iam attach-role-policy \
    --role-name LambdaRole-WorkSpaces \
    --policy-arn arn:aws:iam::aws:policy/AmazonRoute53FullAccess

# Attach the IAM policy required for updating WorkSpaces
aws iam attach-role-policy \
    --role-name LambdaRole-WorkSpaces \
    --policy-arn arn:aws:iam::aws:policy/AmazonWorkSpacesAdmin

# Attach the IAM policy required for logging
aws iam attach-role-policy \
    --role-name LambdaRole-WorkSpaces \
--policy-arn arn:aws:iam::aws:policy/CloudWatchLogsFullAccess- Create the Lambda function at the following URL:
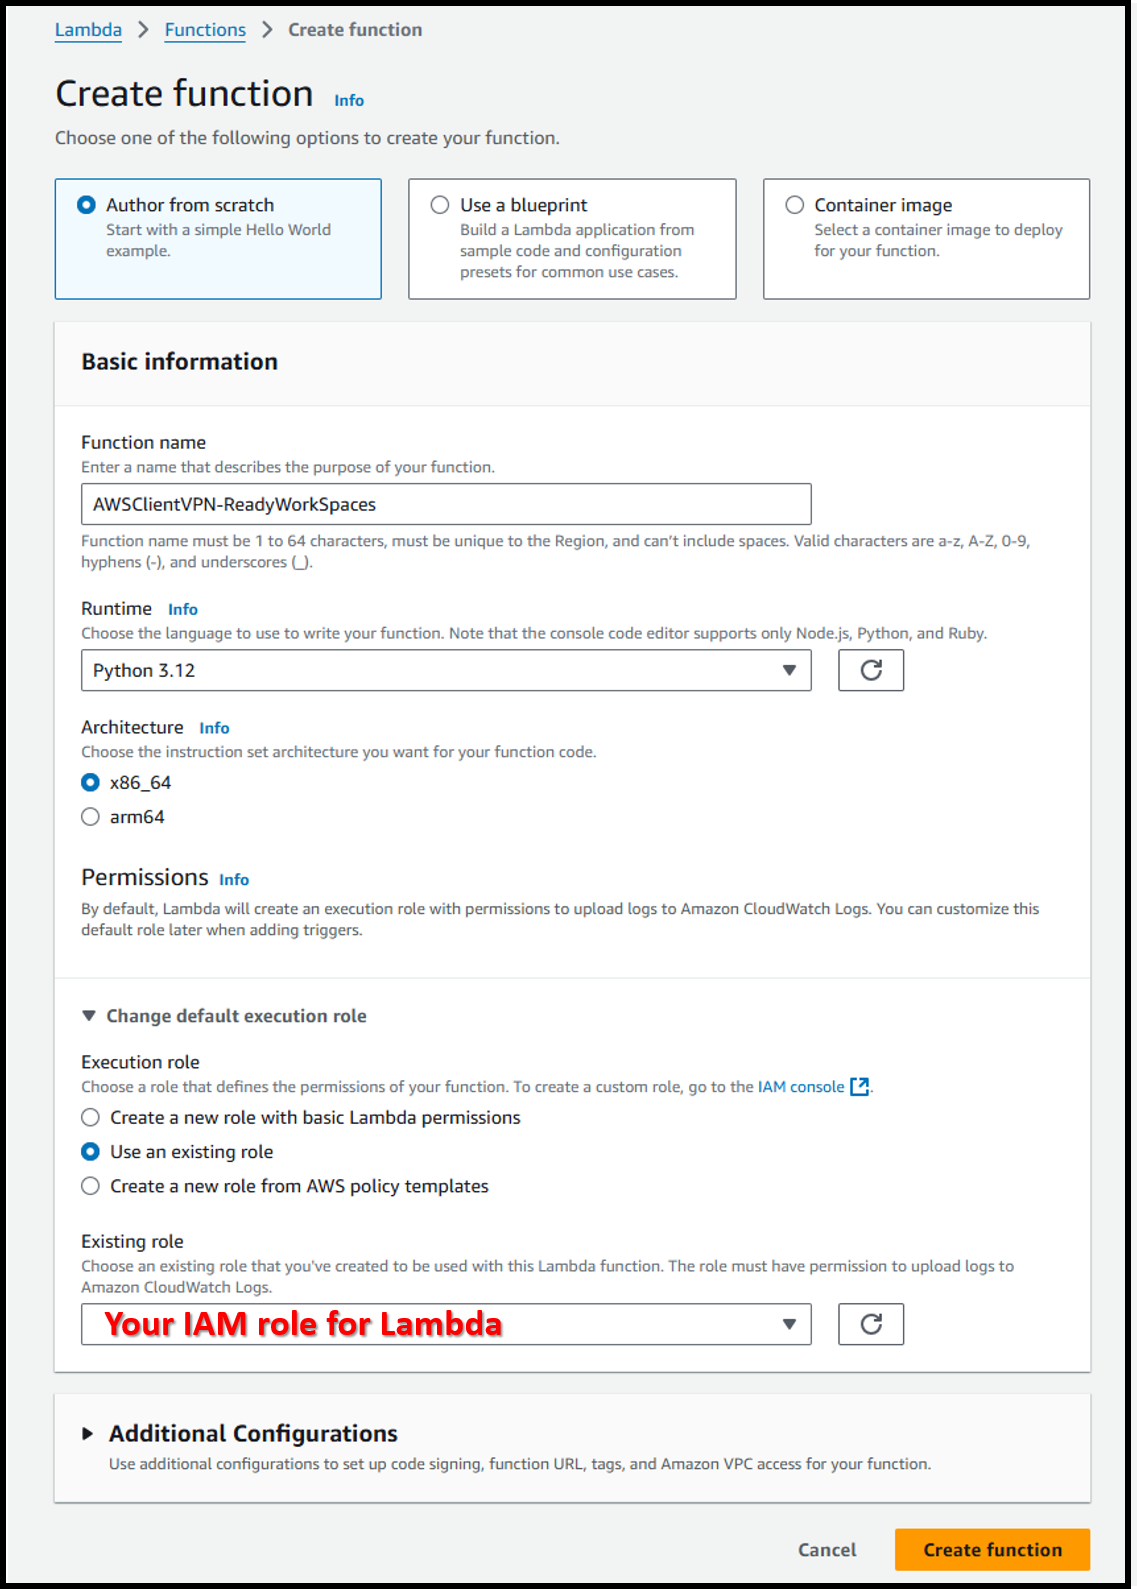
https://us-east-1.console.aws.amazon.com/lambda/home?region=us-east-1#/create/function - Configure with the following settings:
- Function name: AWSClientVPN-ReadyWorkSpaces
Note: It must start with "AWSClientVPN-" † - Runtime: Python 3.12
- Execution role: LambdaRole-WorkSpaces
- Function name: AWSClientVPN-ReadyWorkSpaces
Image
- Go to the [Configuration] tab > [General configuration] and change the timeout to 1 minute.
Image
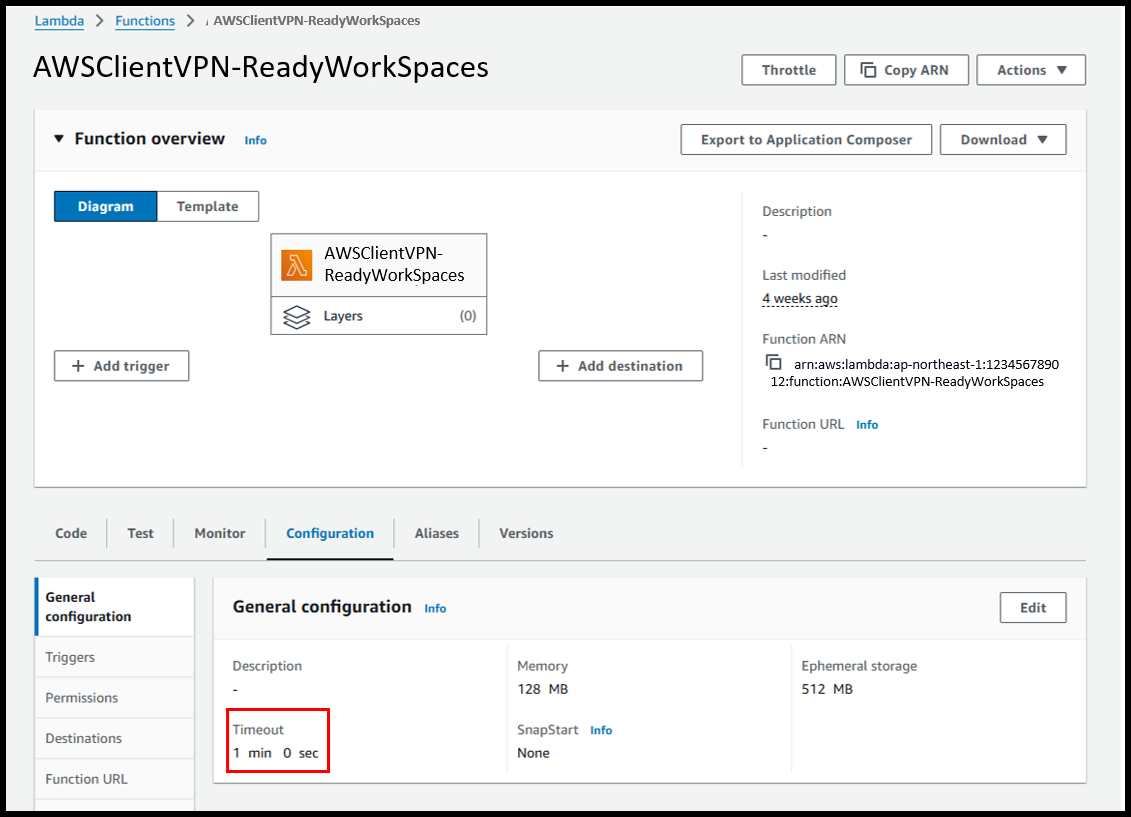
- Next, enter the code for the Lambda function.
Most of it was generated by ChatGPT, and the code is as follows:
import boto3

def lambda_handler(event, context):.

    # Resource information
    directory = '<Your Active Directory ID>'
    hostedzone = '<Your Route 53 Hosted Zone ID>'
    domain = 'user.workspaces'

    # Get username from event
    username = event.get('username')

    if not username:
        return {
            "allow": True,
            "error-msg-on-failed-posture-compliance": "Username not provided",
            "posture-compliance-statuses": [],
            "schema-version": "v2"
        }

    # Create WorkSpaces client
    workspaces_client = boto3.client('workspaces')

    # Get the user's WorkSpaces
    response = workspaces_client.describe_workspaces(
        DirectoryId=directory,
        UserName=username
    )
    workspaces = response.get('Workspaces', [])

    if not workspaces:
        return {
            "allow": True,
            "error-msg-on-failed-posture-compliance": f'No WorkSpaces found for user {username}',
            "posture-compliance-statuses": [],
            "schema-version": "v2"
        }

    # Start WorkSpaces
    workspace_id = workspaces[0]['WorkspaceId']
    workspaces_client.start_workspaces(
        StartWorkspaceRequests=[
            {'WorkspaceId': workspace_id}
        ]
    )

    # Get the IP address of the WorkSpaces
    workspace_ip = workspaces[0]['IpAddress']

    # Create a Route 53 client
    route53_client = boto3.client('route53')

    # Create a subdomain name
    subdomain = f"{username}.{domain}”

    # Create a record
   try:
        route53_client.change_resource_record_sets(
            HostedZoneId=hostedzone,
            ChangeBatch={
                'Changes': [
                    {
                        'Action': 'CREATE',
                        'ResourceRecordSet': {
                            'Name': subdomain,
                            'Type': 'A',
                            'TTL': 300,
                            'ResourceRecords': [{'Value': workspace_ip}]
                        }
                    }
                ]
            }
        )

    except Exception as ex:
        route53_client.change_resource_record_sets(
            HostedZoneId=hostedzone,
            ChangeBatch={
                'Changes': [
                    {
                        'Action': 'UPSERT',
                        'ResourceRecordSet': {
                            'Name': subdomain,
                            'Type': 'A',
                            'TTL': 300,
                            'ResourceRecords': [{'Value': workspace_ip}]
                        }
                    }
                ]
            }
        )

    return {
        "allow": True,
        "error-msg-on-failed-posture-compliance": f'Successfully started WorkSpaces for user {username}',
        "posture-compliance-statuses": [],
        "schema-version": "v2"
    }
Issue a Certificate in ACM
To create a Client VPN endpoint, a certificate from ACM is required.
If you already own a domain, the certificate can be issued instantly, but if not, you’ll need to generate a certificate yourself and import it into ACM.
In my case, I created a certificate using CloudShell and imported it into ACM.
- Start CloudShell by following step "a" in the URL below;
https://docs.aws.amazon.com/cloudshell/latest/userguide/getting-started.html#launch-region-shell
- On the navigation bar, choose the CloudShell icon.

- Run the commands provided in the URL below to issue and import the certificate.
https://docs.aws.amazon.com/vpn/latest/clientvpn-admin/client-auth-mutual-enable.html
$git clone https://github.com/OpenVPN/easy-rsa.git$cd easy-rsa/easyrsa3$./easyrsa init-pki$./easyrsa build-ca nopass$./easyrsa --san=DNS:server build-server-full server nopass$mkdir ~/custom_folder/$cp pki/ca.crt ~/custom_folder/$cp pki/issued/server.crt ~/custom_folder/$cp pki/private/server.key ~/custom_folder/$cd ~/custom_folder/$aws acm import-certificate --certificate fileb://server.crt --private-key fileb://server.key --certificate-chain fileb://ca.crt
Create and Configure Client VPN endpoint
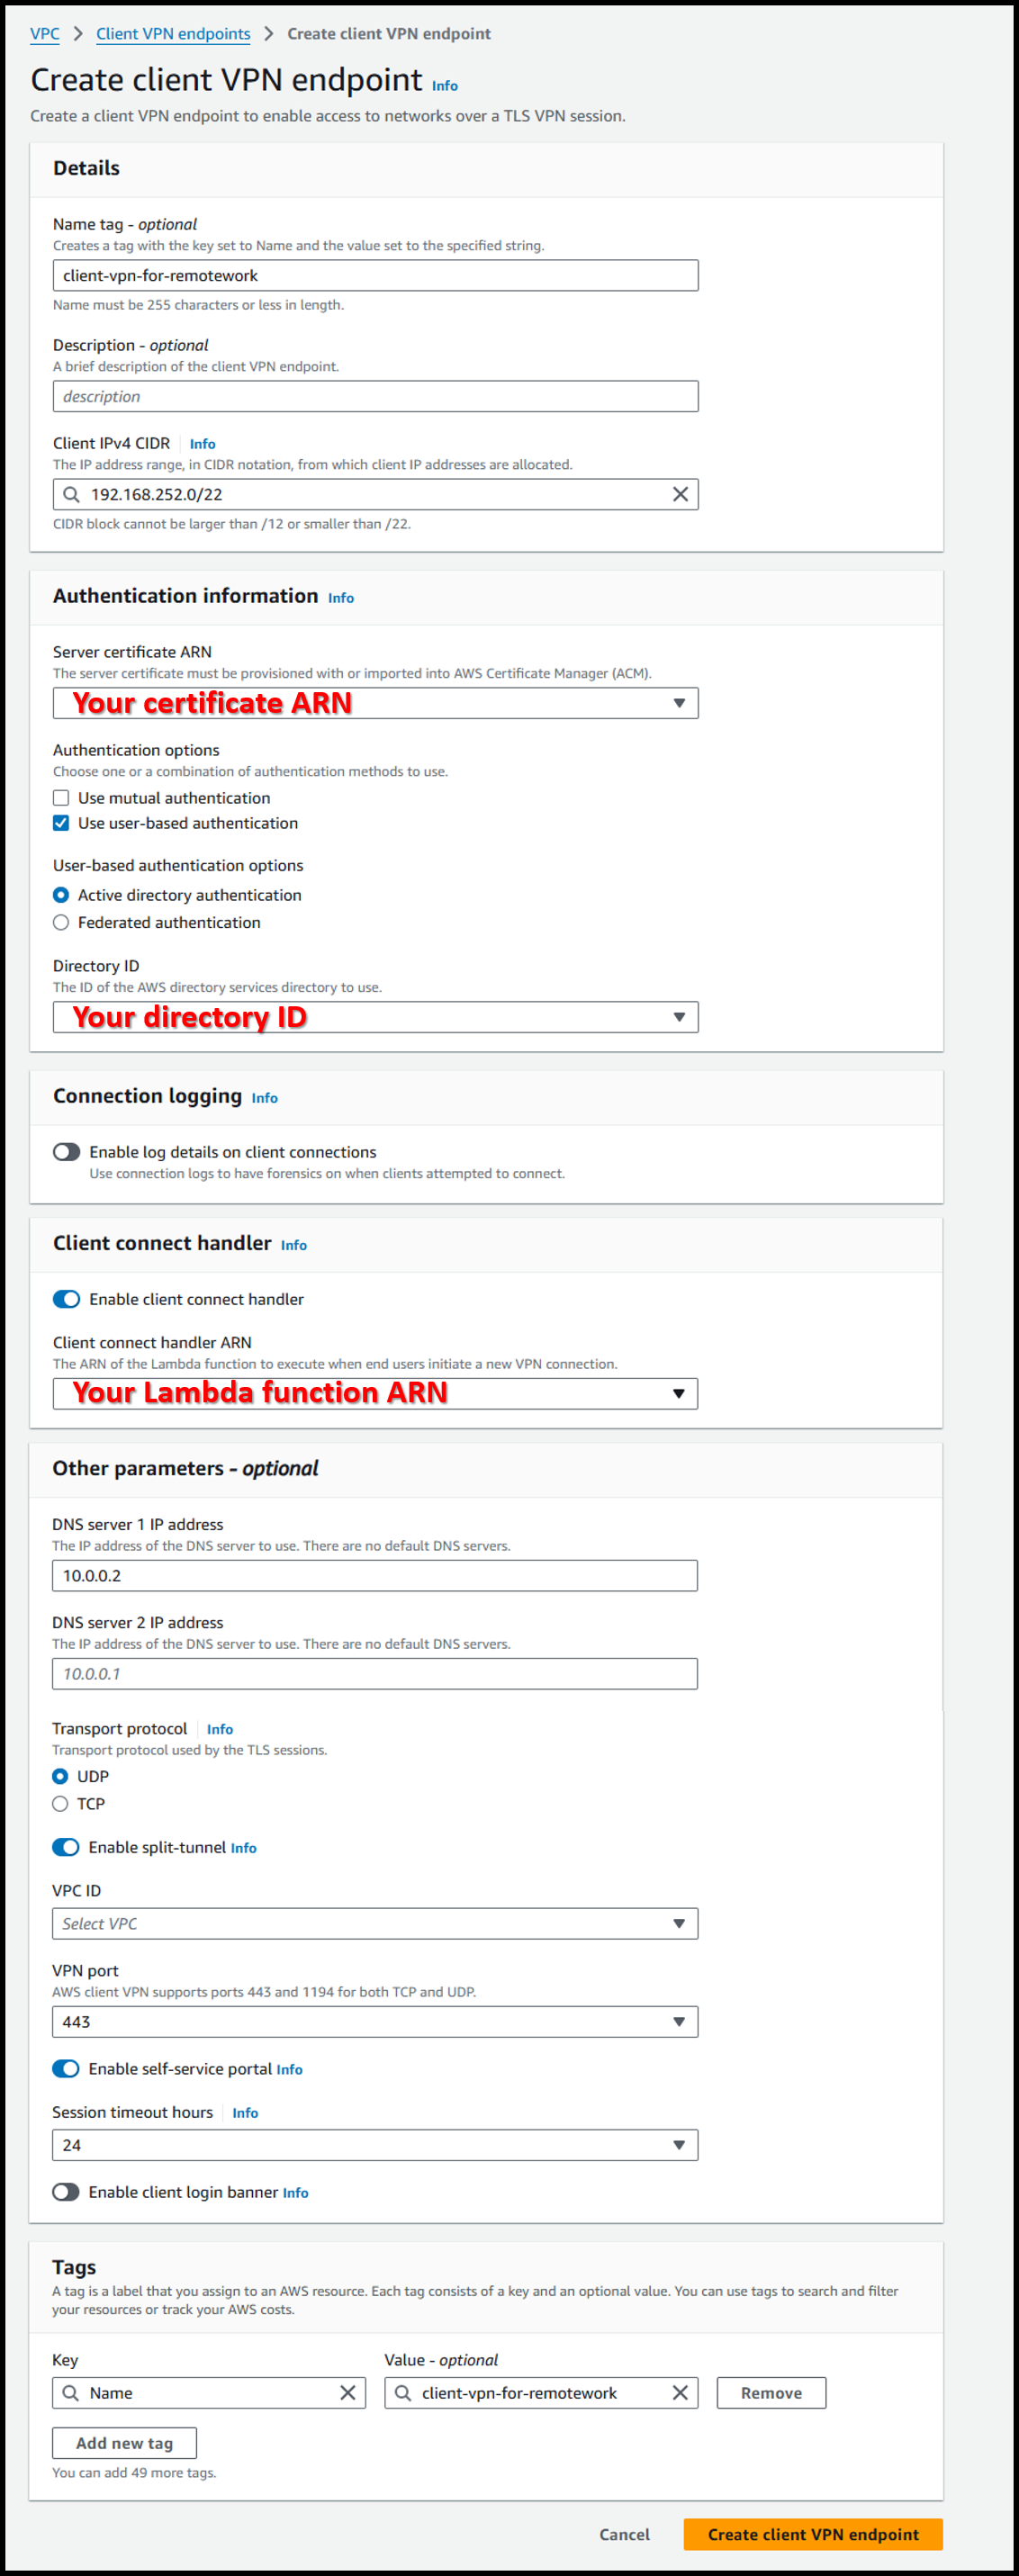
- Create a Client VPN endpoint using the following URL:
https://us-east-1.console.aws.amazon.com/vpcconsole/home?region=us-east-1#CreateClientVpnEndpoint: - Configure with the following settings:
- Name tag - optional: client-vpn-for-remotework
- Client IPv4 CIDR: 192.168.252.0/22
Note: Ensure no overlap with VPC CIDR.† - Server certificate ARN: Certificate imported in Issuing a Certificate in ACM
- Authentication options: ☑️ Use user-based authentication
- User-based authentication options: ⦿ Active directory authentication
- Directory ID: Directory used for WorkSpace
- Other parameters - optional
- DNS server 1 IP address: IP address that is VPC CIDR +2
- For VPC CIDR 10.0.0.0/16, this would be 10.0.0.2.
- Specify VPC CIDR +2 when using a private hosted zone.
- Enable split-tunnel: Enabled
- If disabled, all traffic from the iPad will be routed through AWS.
- Enable this option as only WorkSpaces traffic is required.
- DNS server 1 IP address: IP address that is VPC CIDR +2
- Enable self-service portal: Enabled
- Allows employees to download the configuration file themselves.
Image
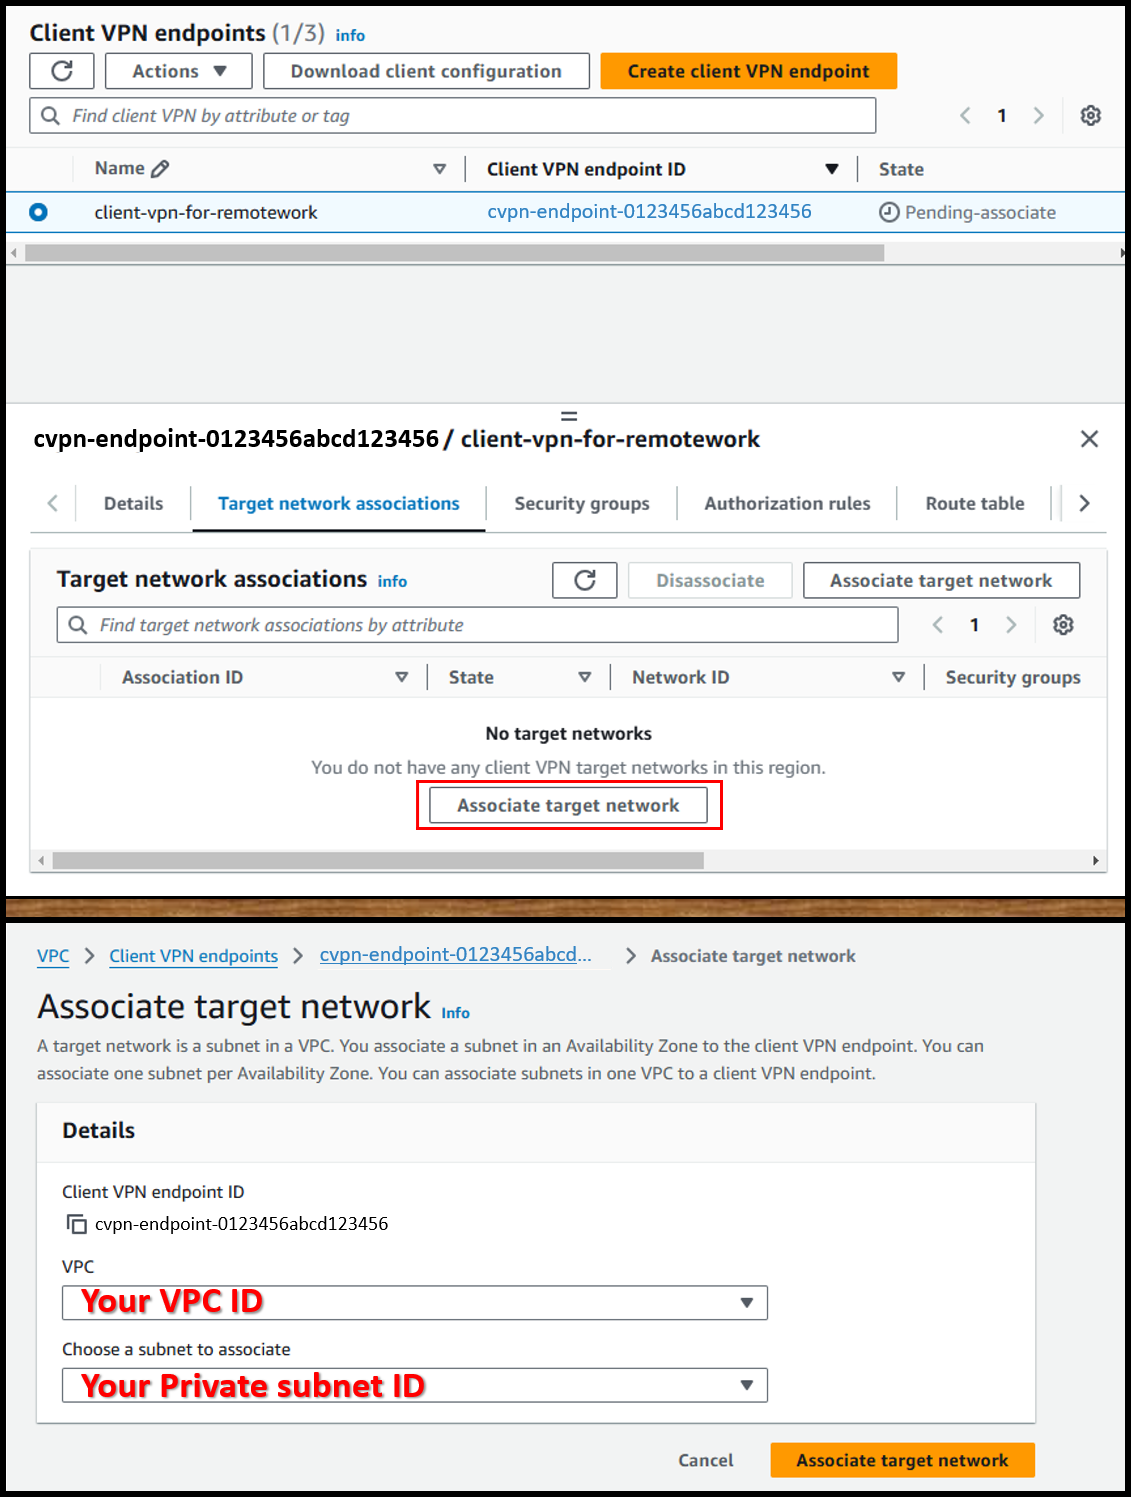
- From the [Target network associations] tab, associate the target network.
- VPC: VPC containing WorkSpaces
- Choose a subnet to associate: One of the private subnets
Image
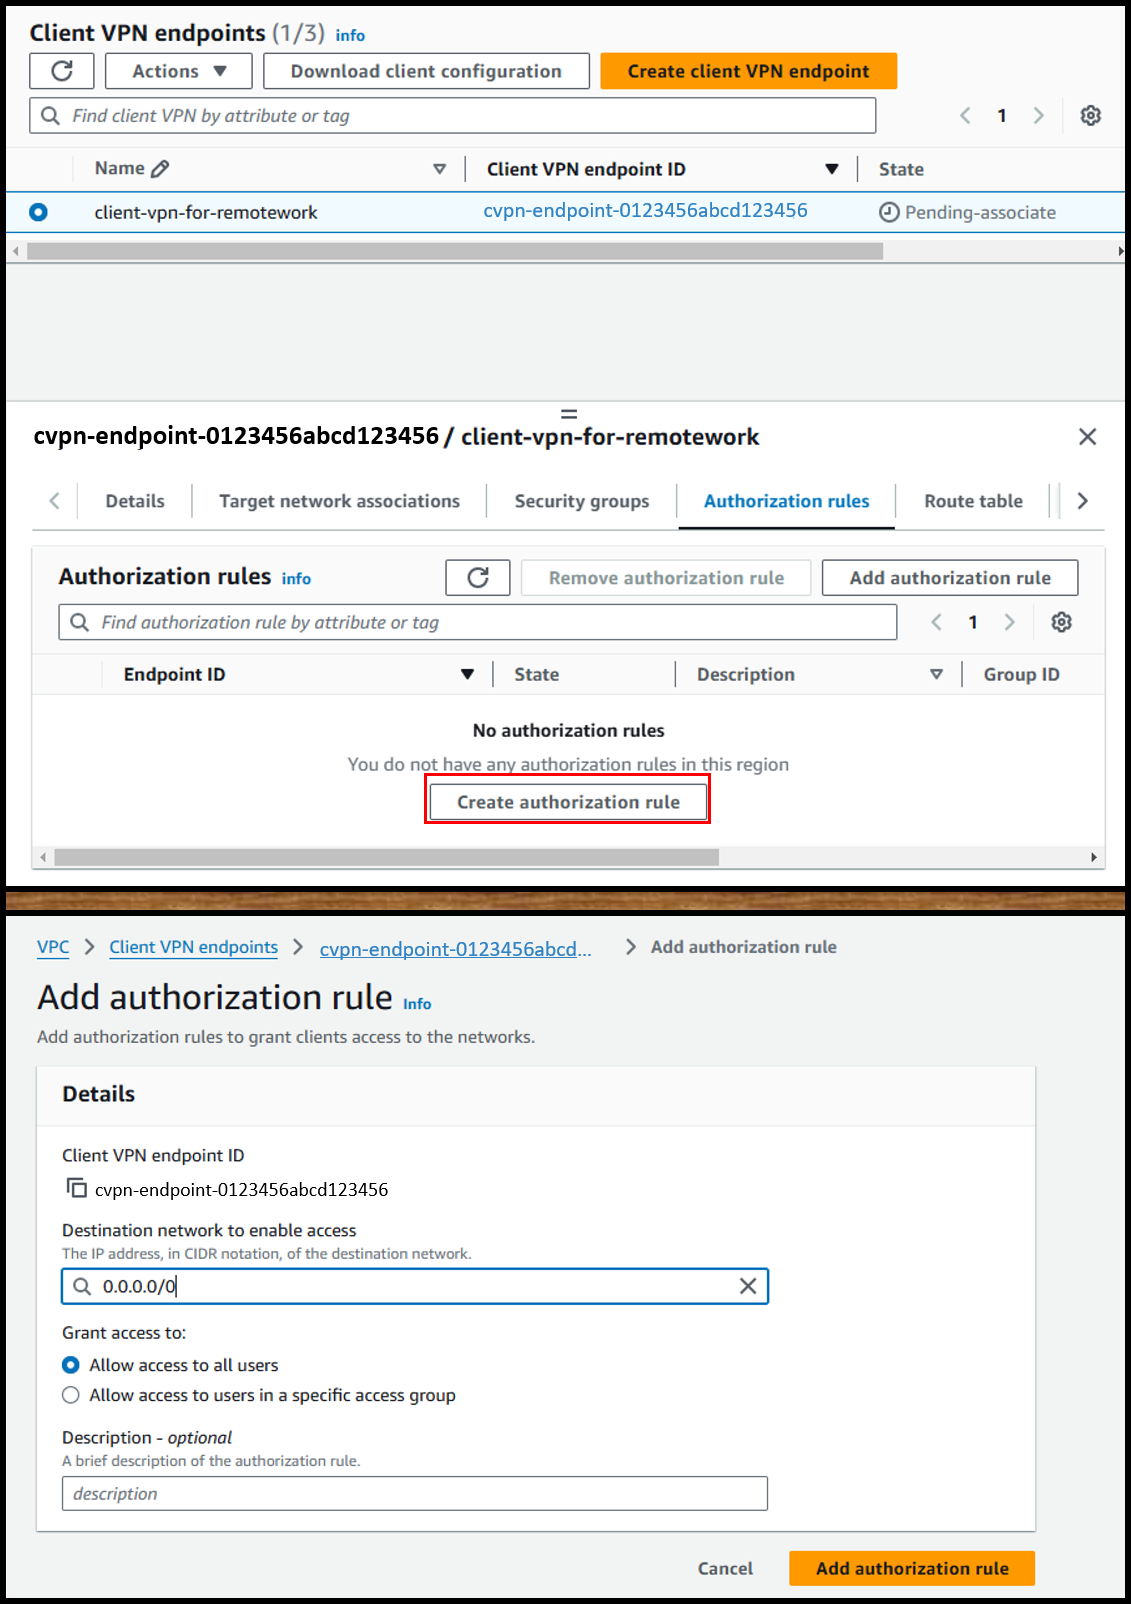
- From the [Authorization rules] tab, add an authorization rule.
- Destination network to enable access: 0.0.0.0/0
- Grant access to: ⦿ Allow access to all users
Image
- Wait until the Client VPN endpoint status changes to Available.
Image

User‘s Procedure
With this configuration, I requested the following from employees:
- Install OpenVPN Client on iPad
- Download the Configuration File from the Self-Service Portal
- URL: https://self-service.clientvpn.amazonaws.com/endpoints/<endpoint-id>
- Import the Configuration File into the OpenVPN Client
- Install RD Client on iPad
- Add PC to the RD Client
- Hostname:
<user-id>.user.workspaces
- Hostname:
For connection, employees connect to the Client VPN using OpenVPN, then use RD Client to connect to WorkSpaces via RDP.
Implementation went smoothly, with few issues encountered.
For now, it seems to be working well, so I’ll monitor the setup.
I hope this information will be helpful to others.
