This article is a continuation of the previous one, where Active Directory has already been set up.
For information on setting up Active Directory, please refer to the previous article.
Background
While working on building a remote work environment on AWS, I received requests from employees wanting to use AWS for their projects.
Although creating a separate AWS account for each project was considered, this approach could lead to a proliferation of AWS accounts.
To streamline billing under a single AWS account, I decided to stick to one AWS account and provide access to users accordingly.
Challenges
The first idea that came to mind was to issue IAM users for the employees.
However, this approach presented several management challenges:
- There are many project members, and issuing IAM users for all of them would be difficult.
- An IAM user cannot belong to multiple IAM groups.
(This becomes problematic when members are part of multiple projects.) - There is a risk of forgetting issued IAM users,
which could result in leftover accounts from employees who have left the company, making it difficult to track their purpose.
As a result, I started searching for a centralized management solution.
Since the remote work environment was already set up to manage user IDs through Active Directory,
I thought it would be ideal to manage user access via Active Directory users.
Method
By using IAM Identity Center, it became clear that centralized management of user access and permissions is possible.
Additionally, it was found that Active Directory can be specified as the source for managed users.
Therefore, I decided to integrate IAM Identity Center with the existing Active Directory to grant access rights to users.
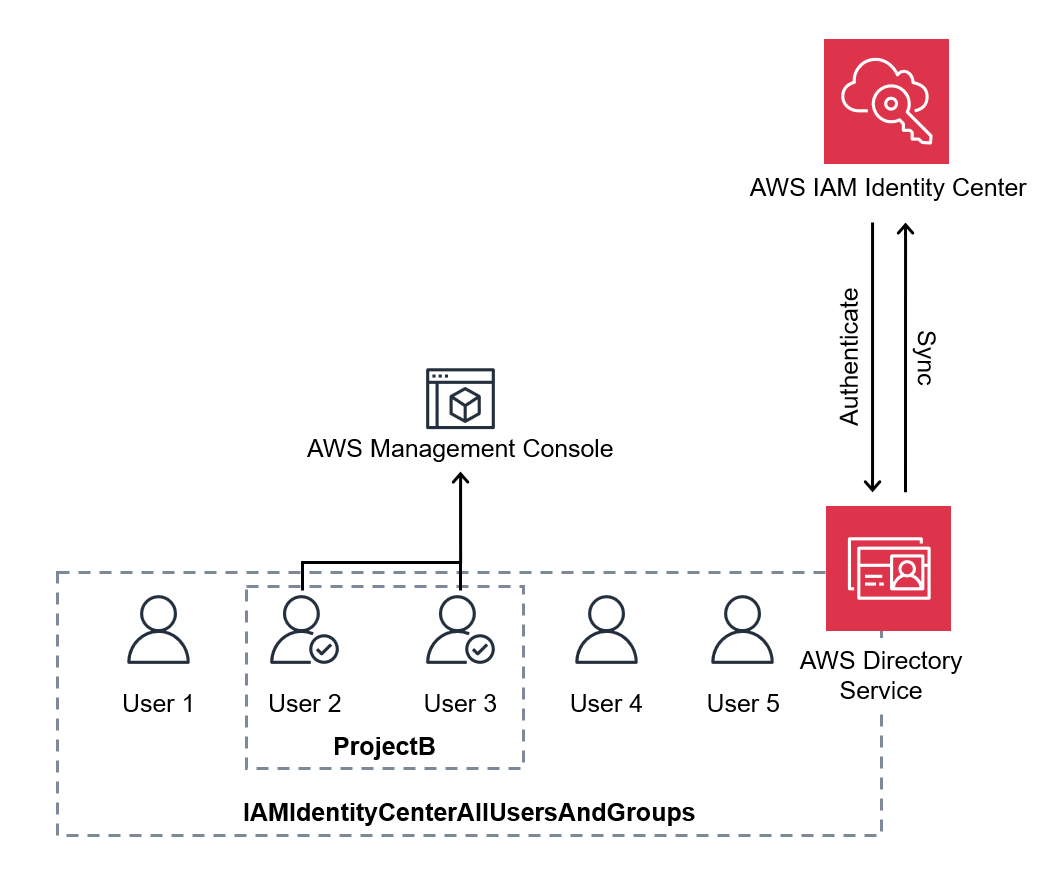
The configuration is roughly as follows:

Administrator’s Procedure
Creating an Active Directory Group (Parent Group)
Even after setting up the integration, not all users in Active Directory are automatically registered in IAM Identity Center.
You need to specify which groups or users to synchronize with IAM Identity Center after the integration.
Therefore, create a parent group that encompasses the target users for synchronization in advance.†
- Use the URL below to create a group.
Replace<Directory ID>with your own Directory ID as needed:
https://us-east-1.console.aws.amazon.com/directoryservicev2/home?region=us-east-1&tab=groups#!/directories/<Directory ID>/createGroup
- [Step 1] Specify Group Details
- Group name: IAMIdentityCenterAllUsersAndGroups
- Group type: ⦿ Security
- Group scope: ⦿ Domain local
Image

- [Step 2 - optional] Add users to group
- Skip this step and click Next.
Image

- [Step 3 - optional] Add child groups
- Skip this step and click Next.
Image

- [Step 4 - optional] Add parent groups
- Skip this step and click Next.
Image

- [Step 5] Review and create group
- Confirm the details and create the group.
Image

Enable IAM Identity Center
- Enable IAM Identity Center from the following URL:
https://us-east-1.console.aws.amazon.com/singlesignon/home
Image

Since there may be a need to link with other AWS accounts in the future, it is recommended to also enable AWS Organizations.
Image

Integration of Active Directory with IAM Identity Center
- Change the identity source from the IAM Identity Center settings page.
Image

- [Step 1] Choose identity source: ⦿ Active Directory
Image

- [Step 2] Connect Active Directory
- Choose an Active Directory: Choose the directory you have configured.
Image

- [Step 3] Confirm change
Image

- After successfully connecting, select Start guided setup from the displayed banner.
Image

- [Step 1 - optional] Configure attribute mappings
- Skip this step and click Next.
Image

- [Step 2 - optional] Configure sync scope
- Enter the group
IAMIdentityCenterAllUsersAndGroupsand click Add.
- Enter the group
Image

- [Step 3] Review and save configuration
Image

- Verify that the group is synchronized with the IAM Identity Center group.
Image

Creating Active Directory Groups (Child Groups)
Create groups for each project and add the users (employees) belonging to that project.
Each project group should be a member of the group IAMIdentityCenterAllUsersAndGroups.
Note that attributes in IAM Identity Center must be unique, so ensure that email addresses do not overlap across all users.
If duplicate email addresses exist, only one of the users will be registered in IAM Identity Center.
- Use the URL below to create a group.
Replace<Directory ID>with your own Directory ID as needed:
https://us-east-1.console.aws.amazon.com/directoryservicev2/home?region=us-east-1&tab=groups#!/directories/<Directory ID>/createGroup - [Step 1] Specify group details
- Group name: ProjectB
- Group type: ⦿ Security
- Group scope: ⦿ Domain Local
Image

- [Step 2 - optional] Add users to group
- Add the users (e.g., User 2, User 3) belonging to ProjectB.
Image

- [Step 3 - optional] Add child groups
- Skip this step and click Next.
Image

- [Step 4 - optional] Add parent groups
- Add the group IAMIdentityCenterAllUsersAndGroups.
Image

- [Step 5] Review and create group
Image

- Verify that the group and users are synchronized with IAM Identity Center.
Note: Synchronization may take between 30 minutes to 2 hours.†
Image

Creating a Permission Set
Set up the access permissions for users belonging to ProjectB.
Grant the PowerUserAccess permission, a predefined policy in AWS.
Description: Provides full access to AWS services and resources, but does not allow management of Users and groups.
https://docs.aws.amazon.com/aws-managed-policy/latest/reference/PowerUserAccess.html
- Follow the steps below to create the permission set.
Image

- [Step 1] Select permission set type
- Permission set type: ⦿ Predefined Permission Set
- Policy for predefined permission set: ⦿ PowerUserAccess
Image

- [Step 2] Specify permission set details
- Permission set name: PowerUserAccess
- Session duration: 1 hour
Image

- [Step 3] Review and create
Image

Assign AWS Account Access
- Assign ProjectB members to the corresponding AWS account through the following steps.
Image

- [Step 1] Select users and groups
- Groups: ☑️ ProjectB@corp.awsexample.com
Image

- [Step 2] Select permission sets
- Permission sets: ☑️ PowerUserAccess
Image

- [Step 3] Review and submit
Image

After completing these steps, users belonging to ProjectB can now log in to the AWS Management Console.
By default, Multi-Factor Authentication (MFA) is enabled for user logins.
From a security standpoint, we kept it enabled in our environment as well.
If needed, MFA can be disabled via the [Authentication] tab in the Settings section of IAM Identity Center.
User‘s Procedure
Login Instructions for ProjectB Members
The following steps were shared with employees in ProjectB for logging in:
- Install Google Authenticator (MFA authentication app) on their personal smartphones.
[Google Play / App Store] - Access the portal using the URL below and enter your username and password.
Replace<Directory ID>with the Directory ID in use:
https://<Directory ID>.awsapps.com/start - Register an MFA device by selecting the authentication app and following these steps:
- Display the QR code.
- Open Google Authenticator on your smartphone.
- Tap the + in the bottom right of the app and scan the QR code.
- Enter the six-digit code displayed under the AWS SSO entry in the app.
- From the [Account] tab in the portal, click PowerUserAccess to log in.
Initially, MFA authentication wasn’t a primary consideration. However, since it was enabled by default, we decided to leave it active to strengthen security.
It seems likely that other projects will request similar setups. If that happens, proper permissions will need to be defined using Permission Sets.


